

Easy DIY Home Improvement Projects for Beginners: A Comprehensive Guide (2026)

That loose handle on the cabinet intrudes into your consciousness every time you reach for a mug. That scratched wall seems to greet you whenever you enter through the door; messy front hallway makes your short trip outside unpleasant. These may seem like trifles, but when combined, they create a house with a complicated appearance to maintain and repair. In order to fix any of the aforementioned problems, you do not need to hire a contractor or to endure a difficult overhaul of the whole house.
If you are new to home repairs, it is possible that even the simplest repair intimidates you. As soon as you step into a home improvement store, you can feel like all the shelves are lined with tools used for certain purposes, kinds of glue and new terms describing the building. There can arise a thought that making something worthwhile takes years of training, expensive tools and skills that you do not have yet. Your first steps in fixing or improving your house do not mean performing everything perfectly well.
The best beginner projects are small improvements that help with solving the particular problems. You do not need to have a shop loaded with wireless saws, and you can even do without remodeling your kitchen in the beginning. It is enough to start from some small and useful project that you can do, learn how to perform the operation, and after the first project you will be able to perform the second one.
Topics Covered

1. Choose Your First DIY Project: Start Small and Solve a Real Problem
2. Plan Your Budget, Materials, and Work Area
3. Assemble a Beginner DIY Toolkit and Follow Essential Safety Practices
4. Begin With No-Drill Fixes and Simple Home Organization
5. Refresh Cabinets and Doors With Simple Hardware Updates
6. Repair Small Wall Imperfections Before Decorating
7. Paint a Small Area to Learn Surface Preparation and Finishing
8. Update Décor With Peel-and-Stick Wallpaper or Backsplash Products
9. Hang Curtains, Artwork, and Lightweight Shelves Securely
10. Improve Comfort With Basic Weatherstripping and Door Draft Solutions
11. Learn Basic Caulking and Furniture Refinishing as Next-Step Projects
12. Inspect Your Work, Maintain the Results, and Know When to Hire a Professional
13. Conclusion
1) Choose Your First DIY Project: Start Small and Solve a Real Problem
The key to building long-term DIY confidence is your first project. Many beginners fail because they just choose a task that is too broad, complicated in its structure, or complicated by time constraints. For example, trying to redo an entire bathroom in just one weekend, as many people do because they want to stick to a set timeline, is a surefire way to experience burn out, resulting in an unusable bathroom and more frustration in the process. Keeping it simple for your first project will provide a platform for safe learning and the satisfaction of completing a well-defined task.
1.1 Conducting a Whole-Home Practical Audit
Start your DIY project by walking through your home in a slow, purposeful manner. Bring a designated note pad or the notes app on your phone to document small inconveniences throughout your home. Be aware of little annoyances that negatively affect the overall quality of your life or your home’s aesthetic appeal:
● Entry points where shoes collect and jackets do not have a place to be hung.
● Door cabinet handles which shake every time you open a drawer.
● Paths around your home which have scuff marks, surface indentations, or unsightly nail holes.
● Doors which throw off a little bit of cold air or will not close tight without an extra shove.
● General spaces having small end tables or chairs that wobble because of an uneven floor.
Do not feel pressured to try to fix the entire list all at once. Go through your notes and identify one thing to fix that creates some instant value for everyday life. Maybe a little tightening of a cabinet handle or patching a shallow hole in the wall provides a nice little success. Some simple wins will help to make some of the new tools feel less scary to demystify what they can actually do, while also instilling patience for the larger projects ahead.
1.2 Assessing Project Difficulty and Unseen Variables
Before you ever purchase one tool or un-attach any fitting, you should assess the scope of your project in four categories, or dimensions.
Before you ever purchase one tool or un-attach any fitting, you should assess the scope of your project in four categories, or dimensions.
1. Tool Needs: Will you be using a standard manual hand tool like a Phillips-head screwdriver? Or will you be using specialized equipment like a motorized wet tile saw? It’s a good idea for beginners to work only on projects that involve standard manual hand tools or a basic variable-speed cordless drill.
2. Surface and Preparation: Determine how much preparatory work you need to do before the substantive work begins? For example, a job requiring 3 days of prep work, such as heavy chemical stripping, masking the floor, and moving furniture before any actual work begins, has a higher barrier to entry in terms of time investment than unscrewing hardware or applying felt floor protection.
3. Physical Access: Where is the workspace located? Simply switching cabinet hardware at eye-level is not a physically demanding task. If a ladder is required to work above a staircase, or squeezed below the bottom of a sink basin, physical and emotional fatigue increase, along with safety issues.
4. Consequences of Mistake: What happens if a mistake is made? If you remove an adhesive hook and it pulls loose, the consequence is drywall compound and a few touches of paint. If you make a mistake with an electrical connection, you will likely end up seriously hurt or have a house fire on your hands. If you cut into a water pipe with pressurized water, you will have water damage to contend with. Keep the consequences of potential errors small until you develop your technical instincts.
1.3 Distinguishing Active Labor from Latent Project Time
One major rookie fallacy is thinking that a “one-hour” action takes an hour of actual time. Since there are often different tasks when doing a work project, you will have different times spent on them:
● Purchasing and Checking: information-gathering via product research, measuring components, shopping in-store, double-checking screw lengths
● Preparing and Masking: prepping surfaces, cleaning the surface, using drop cloth, applying painter’s tape
● Performing the Installation or Application: putting screws in place, spreading compounds, rolling the paint
● Drying, Off-gassing, and Curing Times: this is the important phase of the process when material dries out or gets glued together. A spackle patch may take 5 minutes to fill a hole, but needs 2 to 24 hours to dry completely before it is safe to sand or paint.
1.4 Navigating Rental Agreements and Lease Restrictions
If you are renting your apartment, townhome, or single-family home, then your relationship with DIY involves another layer of administrative caution. Most U.S. residential leases state absolute alterations clauses which generally prohibits any structural or non-structural changes without approval. If you breach these clauses, you risk losing your security deposit or incurring additional repair costs upon your lease expiration.
You should carefully read your lease before doing any permanent or semi-permanent modifications, and look for temporary items that can bring the space back to normal, like:
● Standalone, modular organizing devices that sit on the floor and do not require you to drill into the walls.
● Quality felt pads placed beneath heavier pieces of furniture to protect the hardwood floors from your landlord;
● Removable adhesive knobs and dividers in drawers that organize things;
● Replacement cabinet hardware where you know where in the drawer and hardware was located, and replace it prior to leaving.
If you are thinking of spackling the walls, renoing an accent wall, or installing curtain rods, then ask your landlord or property administrator in writing. Write your landlord a clean intention of what you want to do, and lay out the materials, processes, and color codes you will use and give a written promise that you will return the finishes to their original form upon exiting the lease. Most landlords appreciate the effort taken to improve their property when you take a professional approach to get their approval.
1.5 The Non-Negotiable “Red Line”: What Beginners Must Avoid
It is important to have knowledge of what not to touch as much as it is to have knowledge of how to use a hammer. There are certain systems in the construction of homes that include life-threatening safety issues, municipal permitting requirements surrounding those systems, and a lot of regulatory oversight. As a beginner, there are four areas that one should set up hard boundaries around:

2. Plan Your Budget, Materials, and Work Area
A cluttered work area and mismanaged finances can really ruin the anticipation of a weekend DIY project. Successful DIY enthusiasts invest more time measuring, going through specification sheets, and preparing their physical workspace than when they are engaged in actually hammering nails or painting. Careful measures also ensure that a person does not end up stranded in the middle of a project with the wrong type of screws or wet paint on a pricey rug.
2.1 Defining the Project Scope of Work
Prior to spending your money, easily write up a “Scope of Work” statement. In this process, you identify what the end-state looks like and restrict any project creep. If your original intent was to just change out the drawer pulls in a powder room, a good scope of work keeps you from deciding spontaneously on a Wednesday afternoon, “I think I will just strip the vanity cabinets, change out the sink faucet, and change the tiles around the mirror,” – ah, the momentum of project creep!
Simply document:
● The physical parameters of the task (e.g., “Replace eight 3-inch center-to-center pulls on the kitchen base cabinets”).
● The functional success criteria (each pull is flush, square, firmly fastened without thread striping and functions cleanly without catch).
● The closing point (e.g., original hardware is bagged and stored, cleaned tools – there will be no cabinet painting system or shelf paint job in this scope”).
2.2 Precision Measurement, Material Takeoffs, and Waste Factors
Incorrect measurements lead to needless trips to the store and wasted materials. Don’t rely on misleading sewing tapes and plastic rulers. Instead, obtain a crisp, locking steel tape measure. Record measurements down to standard construction increments (to the sixteenth of an inch).
After getting the measurement recorded accurately, make a detailed list of materials (a material takeoff).
Separate your list into three tiers: main materials, prepping materials, and consumables:
● Main Materials- The finished visible products (i.e. the exact number of handles, amount of paint, rolls of-stick paper).
● Prepping and Securing Materials– The hidden-but-crucial items that provide longevity (i.e., spackling compound, bonding primer, machine screws, sandpaper sheets appropriate for everything).
● Cleanup and Protection Consumables- Rags, drop clothes, painter’s tape, and trash bags.
Whenever estimating the quantity of materials, always add a deliberate waste and overage factor, including:
● Paints and Primers– Calculate square footage (Length × Height of walls). Then subtract all the major windows and doors openings and divide by the coverage rating on the can (usually about 350 to 400 sq. ft. per gallon). You should always purchase enough to professionally apply two full coats plus a 10% excess for touch-ups and porous walls.
● Peel-and-Stick Wall or Tile- The extra stock is necessary for aligning reoccurring patterns, corner wrap-a-rounds, and replacing any cuts made by mistake. Allocate 15% to 20% overage buffer to the square footage calculation.
● Fasteners and Minor Hardware- Buy fasteners in multipack boxes instead of counting exact units. There is no better stress reliever than having replacement screws when you drop that specialized machine screw down the HVAC floor register or strip the drive head.
2.3 Evaluating Building Materials Beyond the Price Tag
When you visit a home improvement store, you may encounter products that do the same job being sold at a large variety of prices. It is very easy to choose the lowest priced option, but there is usually a reason why cheap products have low prices. In the case of many, they’re so cheap because of a number of underlying qualities that will make installing them difficult for a beginner.
- Screws and Fasteners: Cheap screws are commonly produced from soft and low-quality metal alloys. This is the reason why when you put some torque on the screws, they may strip, sheer off, or cam out while inside of wood framing. This creates a difficult situation when it comes to removing them. You’d be better off paying extra for heat-treated, high-quality screws with well-milled driver recesses.
- Paints: The majority of builder-grade paint usually comes in cheap formulations with low density of color. Such paint hides poorly and needs to be applied around four or five times if you want to cover the bare drywall. Instead, you can save yourself a lot of time by using mid-grade or high-grade acrylic paints that come with a high percentage of solids and have great covering power.
- Wall Anchors: Ordinary plastic expansion sleeves have a tendency to rotate easily in drywall. In this case, even the slightest mistake and instead of being screwed tight, it can turn inside the wall. Instead, you might want to pay extra for some special anchors.
2.4 The Contingency Buffer
Regardless of your situation, always reserve an extra 15% to 20% in the project budget for contingencies. In home maintenance, when you get to the part of taking away an old fixture, you always find unexpected problems, such as:
- Taking off an old wall plate might expose broken drywall around the electrical box.
- Removing old baseboard weather stripping might expose rotten wood that needs a quick application of a wood filler.
- You may find out that you don’t have the right hand tools for removing the recessed head of the old hardware, forcing you to go out and get a tool that fits.
If you didn’t have to use up your contingency budget throughout the project, next time it automatically rolls into your new project, and if there are hidden problems, you don’t have to worry about it financially!
2.5 Workspace Sanitation, Floor Masking, and Domestic Containment
Professional tradespeople differentiate themselves from the competitors with how they adequately protect the work site prior to starting the actual work. An unprotected area exposes hard wood floors, carpeting material fibers, and surrounding furniture to fine mineral dust, paint splashes, and heavy dropped tools.

3. Assemble a Beginner DIY Toolkit and Follow Essential Safety Practices
You will not need to spend a lot of money to have a good set of tools. It is definitely better to get together a small useful rolling toolbox of reliable hand tools rather than buying a cheap 200-piece kit made elsewhere that contain poorly cast items that slip, bend, and strip fasteners. With reliable hand tools and some basic safety gear, you will have everything you need to take care of your home for a lifetime.
3.1 The Essential Beginner Manual Toolkit
The fundamental collection of hand tools addresses over 80% of typical entry-level home repair and aesthetic activities:
● 16-to-25 foot Steel Tape Measure: A 1″ blade is strong enough to reach a few feet across the room without bending. The floating rivet on the tip hook is intentional design, not a flaw: it moves exactly the thickness of the metal hook, preserving the accuracy of both inside and outside measurements.
● 9-to-12 inch Torpedo level: This is necessary for hanging pictures, leveling mirrors, and installing floating shelves. These vials contain tinted alcohol with an air bubble; the workpiece is perfectly level if the bubble is in the center of the two reference lines.
● Multi-Bit Screwdriver: An ergonomic handle has a selection of high-quality steel driver bits (Phillips #1, #2, #3; Slotted 1/4″, 3/16″; Torx T15, T20). By using multi-bit drivers, you get as much wittiness as possible, soft screw heads are digressed by exact dimensions, and you do not have to make a mess in your toolbox.
● 16-Ounce Curved Claw Hammer: It is perfectly balanced to install finish nails, tap wall anchors, and remove fasteners. Another hammer should have a fiberglass or forged-steel handle with an elastomeric impact absorbing grip.
● Heavy-duty retractable utility knife: This tool is used for cutting drywall paper, scoring wallpaper, trimming weather stripping, and opening heavy packages. Do not work with a blunt blade. Such blades stick, slip, and require a lot of force. A blade should be replaced immediately upon the first signs of a problem.
● Slip-Joint And Tongue-And-Groove Pliers: A 6-to-8 inch slip-joint plier provides a firm hold on nuts and hardware. An adjustable tongue-and-groove plier gives you the leverage and jaw space required for household alterations.
● 2-to-3 inch Flexible Putty Knife: A flexible blade allows you to feather smoothly over any irregularities of drywall. Stiff blades are designed for scraping off loosening paint; flexible blades are meant for putting compound with precision.
3.2 Hand Tools vs. Stepping Up to a Cordless Drill
Many beginners think they need a powerful electric drill for everything. In fact, hand tools can be safer and more effective for most tasks:
● The Case for Hand Tools: If you are installing delicate decorative cabinet knobs, hanging lightweight artwork that use plastic drywall anchors or attaching plastic wall switch covers, you would be better off using a simple hand-turning screwdriver. You will feel the fastener engage the threads without having to worry about over-torquing, stripping the wood fibers, or snapping fragile parts.
● The Case for a Cordless Drill/Driver: If your project requires drilling into the solid wall framing, attaching dozens of structural wood screws, or boring holes through blocking using spade bits, however, a 12-volt or 18-volt variable speed cordless drill becomes an extremely helpful tool. When operating a cordless drill don’t forget to use one with a mechanical slip-clutch. A mechanical slip-clutch allows one to stop the cordless drill from driving fasteners too deeply or shearing off screw heads.
3.3 Personal Protective Equipment (PPE): Selecting the Right Gear
Consider personal safety to be a primary professional principle rather than an afterthought. Simple home projects can expose your eyes, lungs, skin, and hearing to genuine environmental dangers:
●Eye Protection: Regular prescription eyeglasses or fashion sunglasses cannot protect you from impacts. Always use safety glasses that meet ANSI Z87.1 standards. They have shatter-resistant polycarbonate lenses and side shields to protect from debris, dust, and damage caused by various chemicals.
● Respiratory Protection: Sanding joint compound creates very small airborne gypsum and silica particles, which can get deep into your lungs. Cheap paper dust mask often has leaks around the nose and cheeks. Use a filtering facepiece respirator NIOSH N95 or N100, which has a silver nose clip and two adjustable head straps to ensure 100% seal on the face. If using solvent-based finishes, paint thinner, or oil-based primer with high VOC, use a half-mask elastomeric respirator with cartridges for organic vapors.
●Hand Protection: Always choose a glove material that matches the type of work you are going to do. Thin, powder-free nitrile gloves can be used for coatings, sealants, and cleaning solutions, without affecting the dexterity of your fingers. Use durable, synthetic-leather work gloves with padded palms when working with rough lumber, sharp utility knives, or lifting heavy appliances.
● Hearing Protection: Manual hand tools are usually quiet. However, drills, sanders, and shop vacuums produce noise of excess 85 decibels often during operation. If you are exposed to such noise for a long time, you may experience permanent hearing loss. Always keep a pair of comfortable earplugs nearby.
3.4 Ladder Safety and Physical Ergonomics
In the U.S. every year, falls from ladders are one of the most common forms of preventable domestic injury treated in hospitals:
● Never Build Your Own Ramps: Refrain from standing on dining chairs, revolving office chairs, plastic pails turned upside down, or end tables to gain additional height. Choose only an OSHA-compliant and ANSI-approved Type II (Medium Duty, maximum capacity: 225 lbs) or Type I (Heavy Duty, maximum capacity: 250 lbs) fiberglass or aluminum stepladder.
● Use Three Points of Support: Do not forget to maintain three points of support (two feet and one hand, or two hands and one foot) when climbing or getting down from a stepladder. Keep your belt buckle in the center of side rails; reaching more will destabilize your ladder’s gravity center, causing it to slip outward.
● Honor the Steps: Avoid standing on the top cap or vulnerable folding paint shelf of a stepladder. If you cannot touch your intended work area while standing on the stated lower steps, it means that your ladder is too small for the task. Descend, move, or buy a longer ladder.
3.5 Chemical Off-Gassing and Proper Ventilation
Material such as modern paints, caulks, aerosol primers and adhesives contain different levels of volatile organic compounds (VOCs). Volatile organic compounds are airborne hazards and inhaling them can create health problems, not only temporarily, but permanently as well.
● Be sure to create an active cross-ventilation whenever you open a can of surface preparation chemicals, solvent adhesives or paint. Be sure to have at least two windows open, fixed on opposite sides of your room to create a cross breeze.
● Use an electric box fan in one of those windows, pushing the contaminated air out of the room, while leaving the windows or doors open on the opposite side of your room to let clean, fresh air into your living space.
● If working in a room that lacks actual windows (this can occur in a centrally located hall way or windowless powder room), fans can be adjusted to force the air toward the nearest exterior exit. If this is the situation, you can use painter’s tape and plastic on the central HVAC return air vents in that same room to avoid having the HVAC system disperse fumes all through out your whole house!
3.6 Environmental Hazards: Lead Paint and Asbestos Awareness
If your house was built before 1978, it is safe to assume there are probably layers of paint beneath the exterior paint that contain lead. Prior to 1978, leads were among the most widely accepted pigments in residential application because of their durability and brilliance (particularly the brilliant white);
● The Hazards of Lead Paint: Lead dust is created when lead paint is disturbed and this kind of dust is truly poisonous. It can affect the neurological processes of young children. Any dusty methods of sanding, scraping dry sweeping, etc. will create clouds of toxic lead dust.
● Having the Paint Tested: Before scraping or dry-sanding any painted trim, baseboard, etc. of pre-1978 painted rooms, you should check the painted surface with an EPA-accepted chemical lead test kit (A sodium rhodizonate lead test swab can be found at your local hardware store). If the lead test recognizes lead paint, then no aggressive dry sanding will be done.
Lead-safe renovation, according to EPA Lead-Safe Certified procedures, dictate that lead paint will be wet-sanded and a vacuum is employed to control every aspect of the renovation process and all processes of disposal will comply with all applicable laws.
Besides, houses that were built prior to 1980s may also have asbestos minerals in certain coatings on the paint such as textured finishes of an acoustic ceiling (commonly referred to as ‘popcorn ceilings’), exterior siding, vinyl floor tiles, etc. Additionally, pre-1978 houses may also have baked joint compounds in their drywall.
If these materials are remain undisturbed, they may pose little danger; however, the presence of lead and possible presence of asbestos dust may prove harmful. Any time an unknown textured surface is sanded, cut, or scraped etc., the furnished fibers may release and cause chronic diseases of the lungs.
3.7 Concealed In-Wall Utilities: The Limits of Electronic Stud Finders
When drilling through a wall cavity, we must realize there is more at stake than just drilling into the wood stud. The void between the studs, measuring 3.5 inches, contains several vertical plumbing pipes, pressurized water pipes made of copper and PEX and electrical circuits, just to name a few:
● Limitations of basic stud finders: Basic stud finders use capacitive technology to detect changes in wall density, which indicates the presence of solid framing members. However, these devices, for the most part, give you false positives. They can mistake a vertical metallic pipe or electrical wire that has not been shielded and is running against the drywall as a wooden stud.
● Multi-scanner devices: Purchase an electronic multi-scanner that has active AC live-wire detection capabilities. These devices serve to detectable electromagnetic field created by live 120-volt wires, thus letting you know that you should not drill further.
● Building standards: Remember that electrical wires are typically installed horizontally in wall studs, approximately 8 to 24 inches off the ground and vertically in relation to light switches. Water pipes are installed vertically as well, rising up from the floor and traveling to places like sinks, tubs, and toilets.
● Golden rule: Always proceed with the assumption that there are utilities hidden behind the wall cavity. Never penetrate further than deforming the drywall plus the depth of the anchor, which is normally 1.25 inches. Building standards stipulate working with the wire to be protected or set back at least 1.25 inches from the face of the stud, or, alternatively, effectively shielded.

4. Begin With No-Drill Fixes and Simple Home Organization
If you want to start gaining practical experience from DIY projects yourself, the best idea is to first do things that you know have little impact and consequences. You will not be required to drill or make irreversible changes to your home, so these projects are relatively safe for both careful homeowners and apartment dwellers. Even when you are doing something so simple and inconsequential, you will still learn how to be dexterous, how to operate basic tools. The experience will teach you how you can make minor changes that can enhance the layout and functionality of your home.
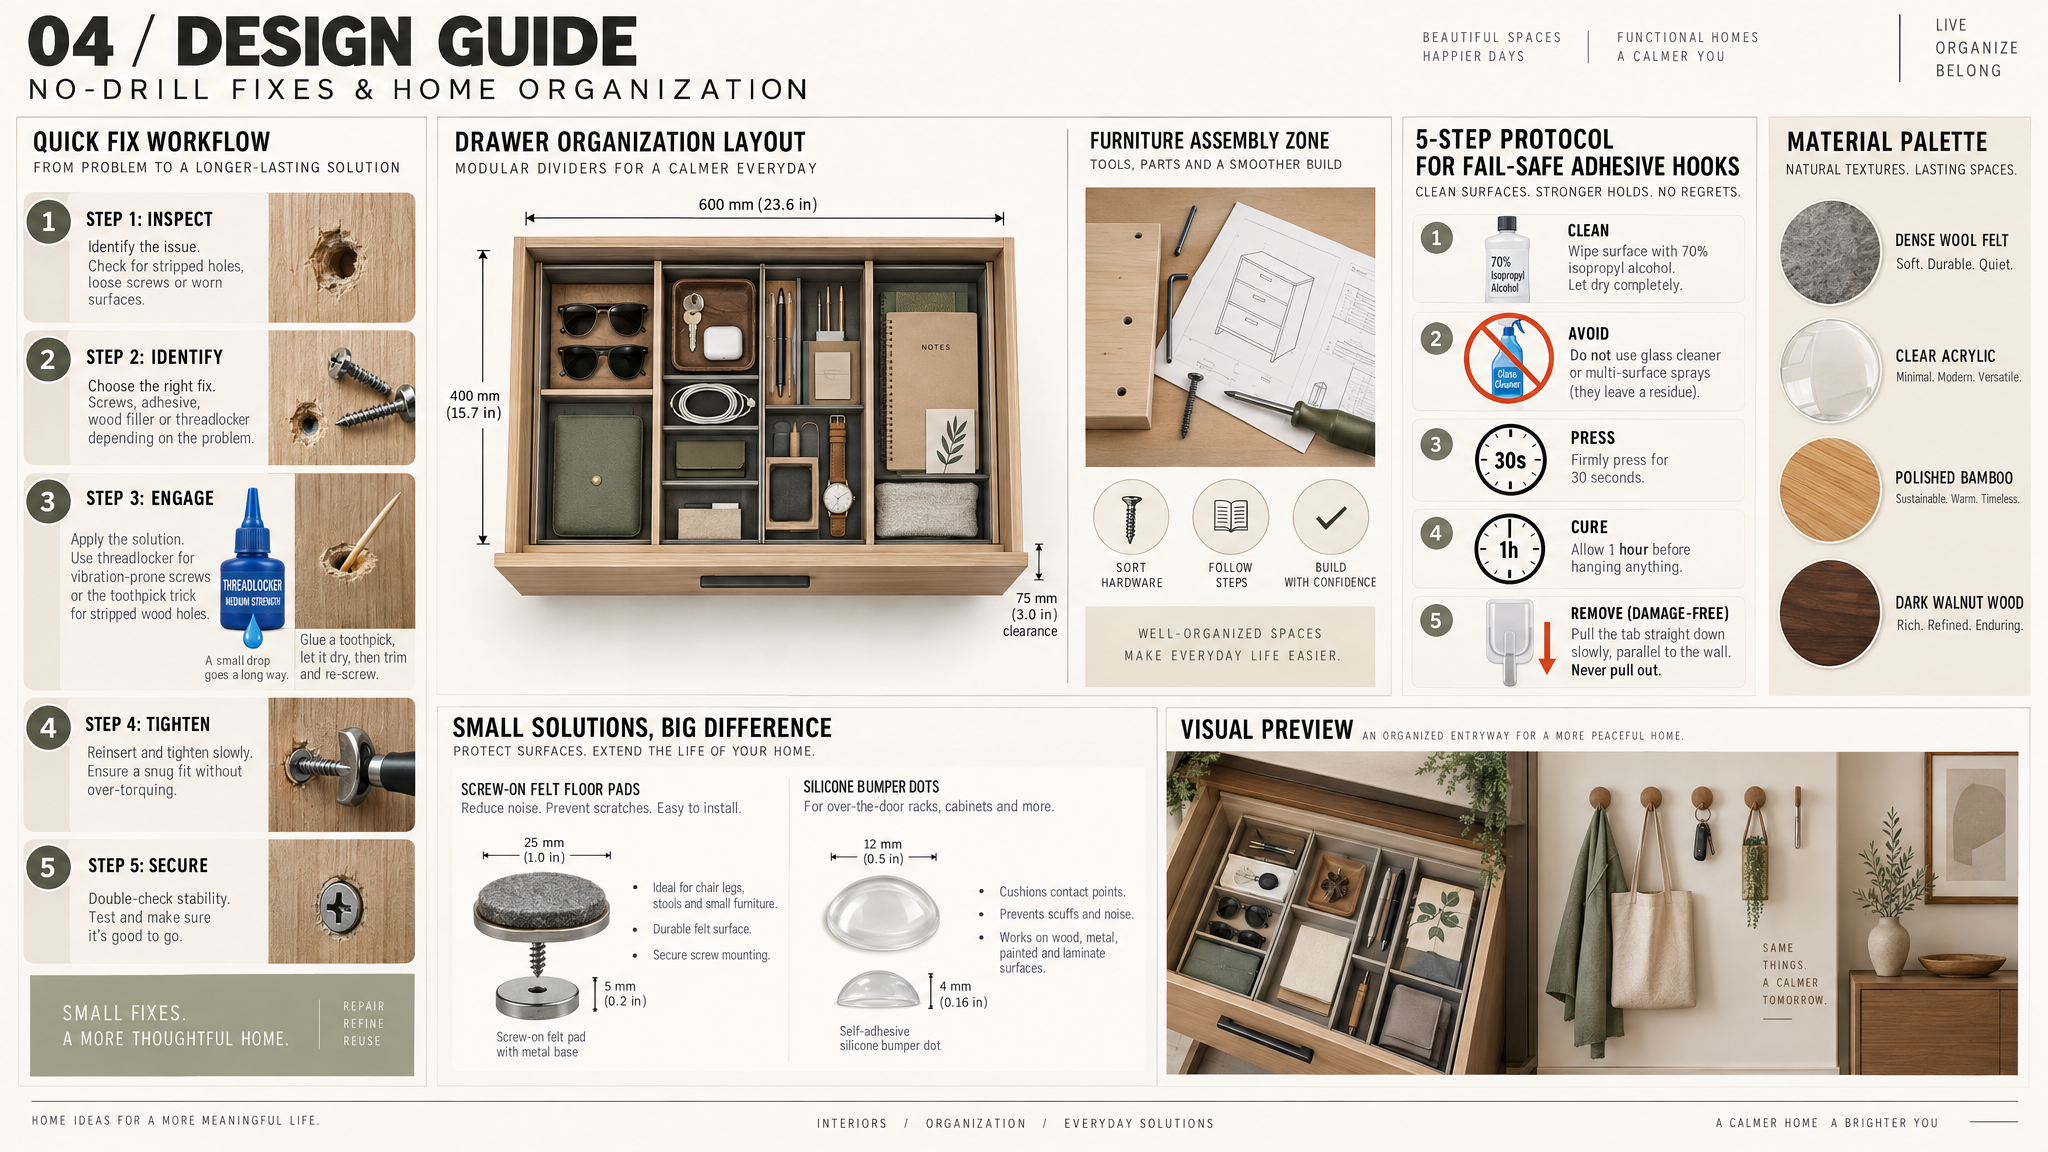
4.1 Reseating and Securing Loose Furniture Fasteners
Every day of the year thousands of chairs, dining tables, side tables and desks wobble around unnecessarily. Furniture settles over time, meaning the wood fibers expand and contract with seasons of humidity, and mechanical port and wood screws that help to hold them together simply come loose.
1. Flip and Inspect: Turn the wobbly furniture piece upside down and place it onto a soft drop cloth or blanket in order to protect any finished surfaces. Look closely at the structural joints, and also the corner braces and leg assemblies.
2. Identify the Fastener Drive: Evaluate if the joint uses Phillips screws, hex-head bolts, or recessed Allen (hex) drive fittings.
3. Pick the Exact-Sized Tool: Never try to fit a tool into a fastener head that is only approximately the right size. If you try to use a #1 Phillips driver in a #2 screw it is going to slip in the screw and round out the recess in the metal drive. You should have a driver that sits all the way down and holds up its own weight without wobbling.
4. Apply Controlled Torque: Hold the driver perfectly perpendicular to the fastener and apply downward force along the shaft while turning clockwise. If you come across one that is a bolt that is screwing into a metal receiving nut that has been untightening consistently, unscrew it completely, then put a single drop of blue thread locker compound (like Loctite 242) on the metal threads, then screw back into place. The thread locker compound cures without air, meaning that it will not get untightened because of vibration and it can be removed with hand tools afterwards.
5. Repairing Stripped Wood Screw Holes: If you find that a wood screw simply spins without getting tight because the wood fibers have become stripped then you should not force a larger screw into the same place incase it splinters the wood. The first part to repairing it is removing the screw entirely. Once you have done this, dip some wooden toothpicks or a wooden matchstick (without the strike head) into standard PVA wood glue then insert the wooden toothpicks into the stripped wood screw hole.
Leave the glue to set for two hours, then use a utility knife to cut the match or toothpicks down so they are flush. After the glue has completely dried you can put the wood screw back it. Since the toothpicks are made of wood, they give the screw the ability to bite into the new wood fibers that they for support.
4.2 Preserving Hard Surfaces with Industrial-Grade Felt Floor Protectors
Dragging heavy chairs, tables, and couches on wood, engineered vinyl plank, or linoleum will create ugly scratches and gouges. Inexpensive peel-and-stick felt dots often fall off in no time at all thanks to skimpy adhesive and dirty furniture legs.
• Surface Preparation: Get the couch or chair upside down. Scrape off the old adhesive residue or worn plastic glides with a flexible putty knife. Take a microfiber cloth and dampen it with 50/50 isopropyl alcohol and water and wipe underneath the bottom of each furniture leg to dissolve any body oil, grease and dust. Let the surface dry completely for three minutes.
• Felt Pads: Buy heavy-duty felt pads made of dense wool or synthetic blend with aggressive acrylic adhesives. For dining chairs that move back and forth constantly, get pads the exact same size as the diameter of the leg, or use large sheets of felt and cut your own shapes.
• How to Attach: Peel stick-on paper off without touching the adhesive side with your skin. Center the pad on the leg foot then press firmly for thirty seconds.
• Mechanical Screw-On Protectors for Dining Furniture: Because adhesive only pads will eventually want to move sideways from all the lateral motion from a heavy-use dining chair, consider upgrading to screw-on or nail-on felt glides. Drill a shallow 1/16-inch pilot hole in the exact center of each wooden leg so you don’t split the wood, and insert the screw-and-felt unit flush.
4.3 Drawer and Shelf Organization Using Modular Inserts
Kitchen, bathroom, and home office drawers can quickly become disorganized hodgepodges of items. Getting organized involves creating order within a limited volume:
● The Deep Cleaning: Remove the drawer from whatever has been holding it. Empty the contents of the drawer, throw away everything that expires, and vacuum away and leftover crumbs or debris. Then, easily wipe down the inside with a basic cleaner.
● Measure Three Dimensions: Most people only think to get the length and width of the drawer; however, they forget to account for the vertical height/clearance. Measure the interior depth, width, and height of the drawer. Remember to measure the total usable vertical space between the bottom of the drawer box and from the top of the cabinet frame. This will help you avoid getting organization bins that get stuck on the cabinet frame when you try to shut the drawer.
● Non-slip Liners: Manage to cut a really nice gripping vinyl (or natural rubber) non-adhesive liner that will fit the bottom of the drawer box. High-quality non-adhesive liners provide surface friction, they protect the wood below them from any drips, and you can easily take them out and run them in the sink without ruining whatever delicate finish is present.
● Installing Modular Organizers: Group any loose items according to their use/function. Place similar use items into rigid (such as bamboo, clear acrylic, fd. powder coated wire) rectangular organization bins. Having rectangular bins that can interlock with one another will allow you to adjust the configuration based on changing use.
4.4 Freestanding and Tension-Based Functional Storage Solutions
When it is not permissible to make wall penetrations, utilize vertical, tension, and freestanding organizational systems for vertical storage:
• Vertical Spring-Loaded Tension Organizers: It is possible to use vertical tension rods within deep cabinets or closets for vertical storage of baking sheets, cutting boards, and shallow trays. Ensure that the rubber tip is in contact with solid surfaces to avoid the items slipping under weight.
• Over-the-Door Storage Racks: The usage of over-the-door storage racks will increase the amount of storage space in the pantry, as well as utility and bathroom entryway closets. To prevent the over-the-door rack from rattling or marking up painted door faces, you should install small adhesive silicone bumper dots along the back of the rack where it makes contact with the door.
• Freestanding Entryway and Utility Furniture: Freestanding entryway furniture such as hall trees or coat racks are perfect for providing functional everyday storage without the need to do any damage to the wall. Always make sure to keep stability as a priority, making sure that the bottom is wide enough for it not to tip over.
4.5 The Safe Application and Removal of Heavy-Duty Adhesive Hooks
Contemporary adhesives hooks and mounting strips (e.g. 3M Command brand) are capable of holding significant weight without wall anchors, as long as you follow the manufacturer’s recommendations for chemical and mechanical performance:
● Compatibility with surface: Adhesive strips are required to be placed on flat, smooth, and non-porous surfaces. They adhere perfectly on smooth painted drywall or sealed wood, glass, and tile. However, they will never stick properly if placed on uneven and rough surfaces such as masonry, plaster with texture, soft textile, unfinished wood, or vinyl wallcovering.
● Surface preparation: Don’t use any regular household glass or surface cleaners to wipe the wall, as there will be invisible silicone, glycol, or surfactant films, which will not allow adhesive to adhere to the wall. Only use isopropyl rubbing alcohol to wipe the wall, and make sure to let it dry.
● Mechanical bonding: Place the adhesive strip on the wall, remove the protective layer, and press firmly while holding the hook in place for a thirty-second period. Note that pressure-sensitive adhesives require real pressure, which means it is necessary to press the hook onto surface to wet and make the adhesive spread.
● Awareness of requiring curing time: The major problem with adhesive hooks is to hang something immediately after they are put in place. You should wait about an hour before hanging something on the hook to let the acrylic adhesive develop its adhesive properties and stick to the surface.
● Understanding the weight limits: When it is stated that there is a 5-pound rated hook, it means that it was tested under a load in a dry and controlled climate while hanging something straight down, and not swinging 90 degrees, etc. If you are hanging something heavy, be sure to purchase a weight limit double as much as you intend to hang on the hook.
● Removal techniques: You should never pry off the hook with a screwdriver or try to pull it in your direction, as this will tear the paper face of drywall. What you should do, instead, is stretch the bottom exposed part of the silicone down the wall, stretching it to 12 inches and parallel to the wall surface to remove it without tearing paint or drywall.
5. Refresh Cabinets and Doors With Simple Hardware Updates
Changing and upgrading the old cabinet knobs and drawer pulls is one of the best and high-value cosmetic projects you can engage in. New hardware immediately brings new life to an old kitchen, bathroom vanity or wardrobe. Installing the upgraded hardware is fairly simple, but doing it precisely involves measuring properly and putting in considerable amount of focus.
5.1 Understanding Center-to-Center Dimensions
Cabinet pulls are usually classified by their “center-to-center” (CTC) spacing, which is the precise measurement from the center of each screw hole to the center of the other screw hole. Many beginners make the mistake of measuring the total outside length of the handle, only to find out that the new cabinet pulls’ mounting holes would not align with their cabinets.
● Some common U.S. standard center-to-center measurements are 3 inches (76.2 mm), 3-3/4 inches (96 mm), 4 inches (101.6 mm), and 5 inches (128 mm).
● Unscrew one of the pulls from your cabinets and place it on a flat working surface. Measure the distance in millimeters or sixteenths of an inch between the centers of threaded holes.
● Always try to pick replacement hardware that has the same center-to-center measurement as above. If you use existing holes, you would not need to fill, sand, and paint old drilling holes.
5.2 Screw Length, Thread Specifications, and Cabinet Thickness
Cabinet hardware is typically secured with standard machine screws. The most common thread size for machine screws is 8-32, which is the industry standard for the 8-gauge screw that has 32 threads per inch. Machine screws have a flat blunt end and they should thread smoothly into the tapped mounting holes in the hardware:
● Cabinet Doors: Standard cabinet doors usually measure 3/4 inch thickness. The screws used in this case should be 1-inch long 8-32 machine screws for a threaded section of 1/4 inch into the body of the hardware.
● Drawers: It usually has a “five-piece” construction involving a decorative drawer front and a structural drawer box. In this case, the total thickness will make a combined thickness of 1-1/4 inch to 1-1/2 inches.
● Breakaway screws: You should have some segment-scored “breakaway” or truss-head screws in stock when you buy a replacement hardware because they are provided notched sections every 1/4 inch along their shaft, which allows cutting them to length easily with pliers or wire stripping tool to fit the odd thickness of the drawer.
5.3 Precision Drilling: Using Templates and Scrap Testing
If you plan on adding hardware to bare cabinets, or you’re moving from single-hole knobs to two-hole pulls, precise hole location is a must. A misdrilled hole means your hardware will appear crooked, which is an ugly sight that you will regret:
● Use a Sturdy drilling template: Never do hand measuring when drilling dozens of cabinet doors. Buy a cheap plastic cabinet hardware drilling jig or make your own out of a piece of 1/4-inch piece of plywood scrap. These jigs will hook over both the top and side edges of the cabinet door to place the drill bit in exactly the same place each time.
● The Scrap Material Test: Before you drill any part of your cabinet, position your template over a scrap piece of wood that has the same thickness as your cabinet doors and clamp it down. Drill the holes correctly, use your level to ensure the hardware will install level, and attach one pull. Before moving to the next cabinet, confirm the back of the screw head does not hit interior drawer slides, or shelving brackets.
● Drilling Clean Holes Without Blow-Out: You will want to use a sharp 3/16-inch brad-point drill bit instead of a regular twist drill bit. The sharp spur at the tip of a brad-point drill bit keeps the bit centered, while the outer cutting flutes cuts through wood fibers cleanly. Make sure to hold a flat block of scrap wood behind the cabinet door while drilling through the wood. This will make sure the wood grain is supported, and will not splinter on the inside of the door.
5.4 Proper Torquing and Securing Hardware
It is best to use a hand-held screwdriver when fastening new hardware into place. Cordless drills spin too fast and produce more torque than needed; this can very easily strip out the soft zinc or brass threads of decorative pulls since the head of the screw may turn only a few degrees.
● Tighten the screw by hand so that the head sits tightly against the wood and does not move around.
● Avoid over-tightening, because it can crush the veneer of wood, warp beautiful faces of drawers, and potentially break the screw off right under the handle.
● In case the knob or the pull is prone to turning loose with time, take a small #8 internal-tooth star lock washer and place it under the head of the screw. The teeth on the star-shaped washer will grip both the screw head and the wood in order to avoid any loosening that could take place while applying excessive torque.
5.5 Organizing and Storing Removed Hardware
If you’re renting your home or intend to sell in the near future, keep all of the original hardware organized in case you need to reinstall:
● As you take off each piece of old hardware, place it into a secure, sealable plastic storage bag along with the respective mounting screws that came with the hardware.
● With a permanent marker, label each bag with its original location (i.e., “Kitchen – Upper Perimeter Cabinets,” “Powder Room – Vanity Drawers”).
● Then place the labeled bags into a solid box and store it in a climate controlled place, away from excess moisture. Doing so, makes the reversal of the install clean, quick, and simple when it is time to move out.

6. Repair Small Wall Imperfections Before Decorating
Before you pick up a paintbrush or unroll decorative wallpaper, you will need to prepare the walls properly. Walls can easily incur small amounts of damage, e.g., nail holes from pictures, little scuff marks by furniture, small tear-outs from some anchors, or hairline cracks due to settling.
These blemishes do not disappear when they are painted over because of the slight sheen in the new paint that emphasizes the indentations and ridges underneath. One of the best skills that any DIY person can learn is basic drywall patching.
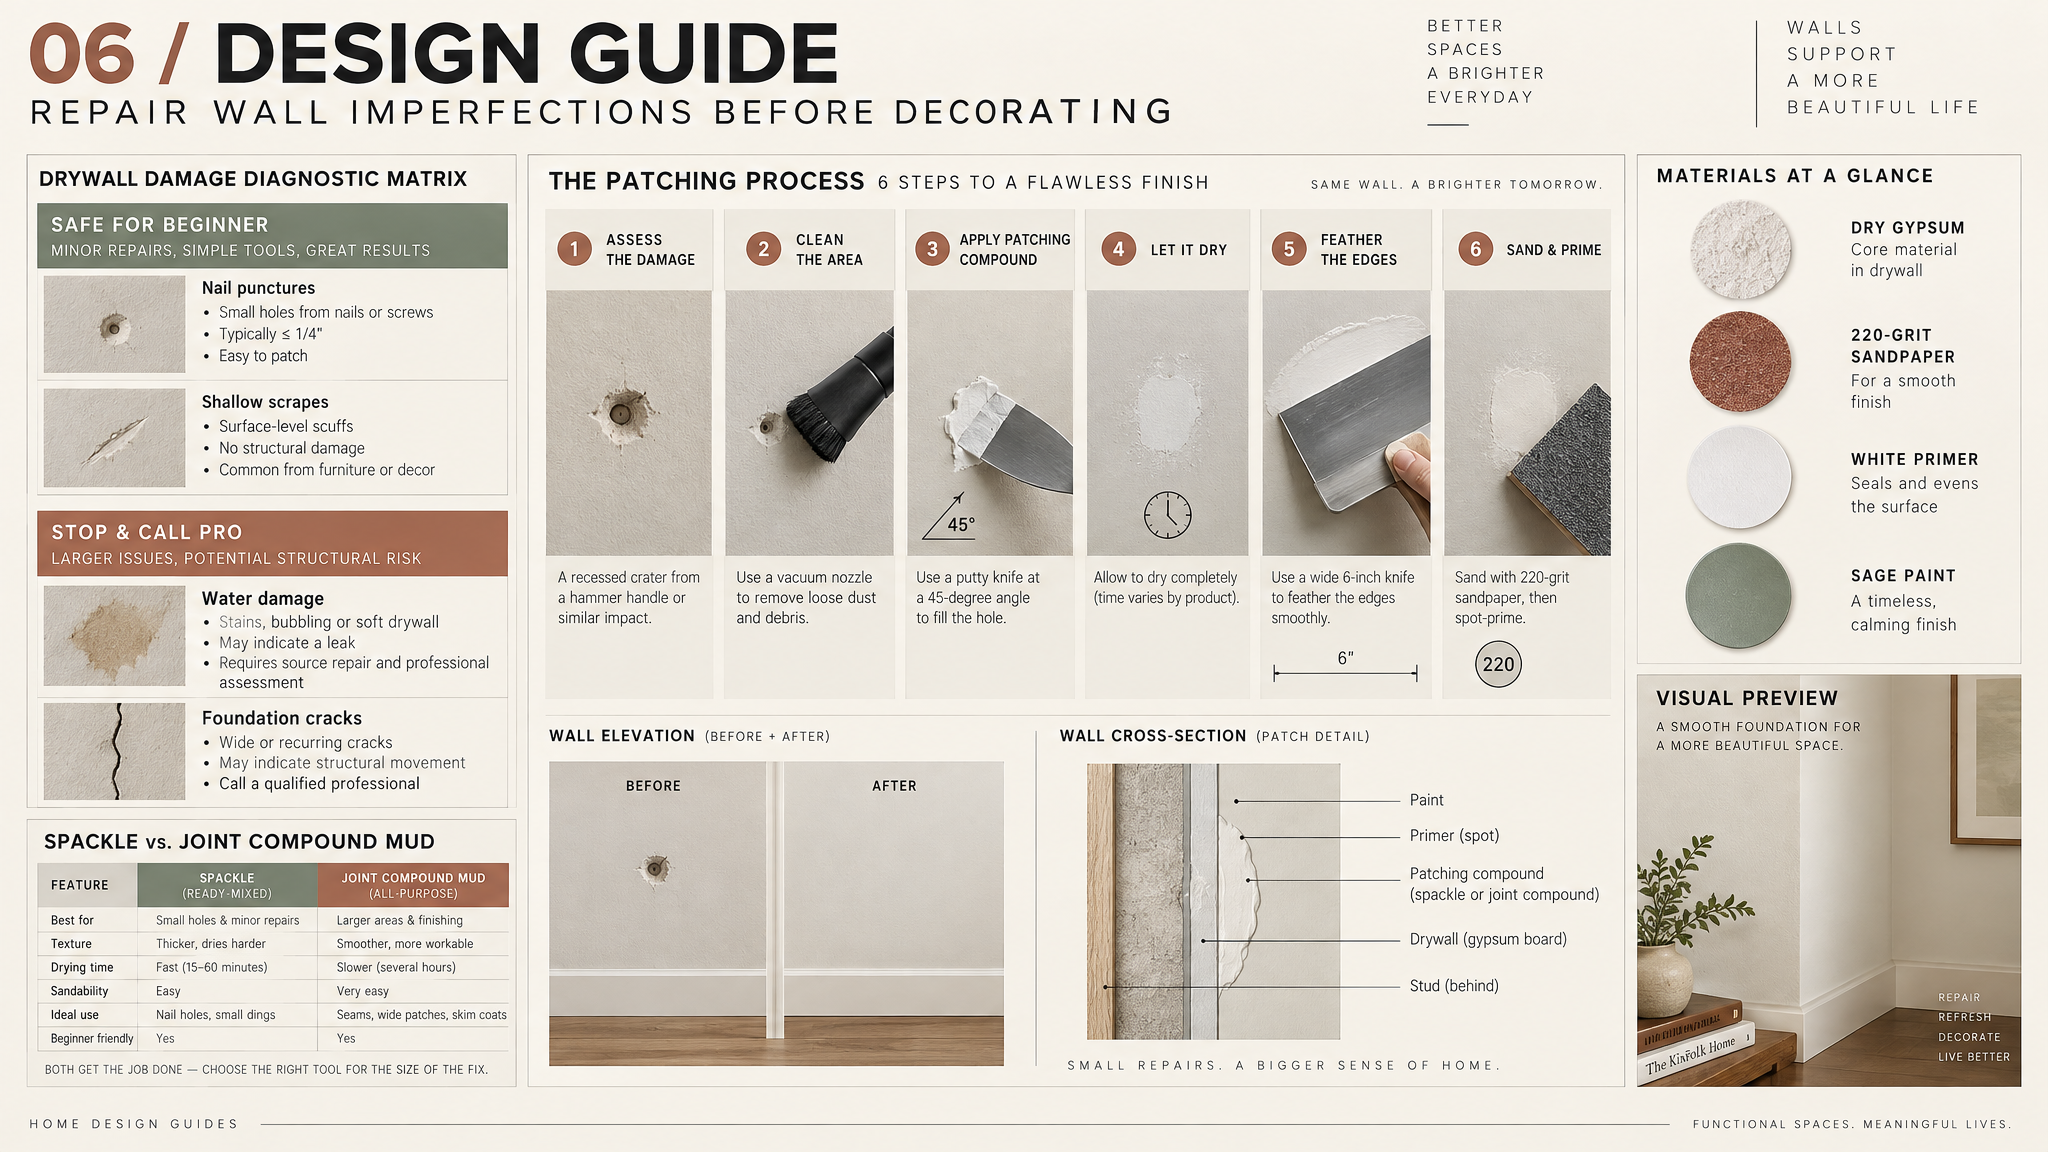
6.1 Diagnosing Wall Damage: What to Patch vs. What to Escalate
There are not just cosmetic deficiencies found on the wall. Do not simply put spackle on the imperfections without understanding the problem first:
If you notice damp drywall, smells, or brown stains on your wall, you can be sure that putting spackle on the damage will not help. These are signs of an active plumbing leak, a poor roof, or possibly mold in the wall space.
6.2 Patching Compounds: Spackle vs. Joint Compound
If you’re navigating through a hardware store’s drywall repair aisle, you will see two lead products – spackling compound and joint compound. Differentiating between the two will help you choose the appropriate one for your task:
● Lightweight spackling compound: This product is prepared with lightweight micro-balloons and acrylic binders. Spackle dries rapidly, has little shrinkage, and works perfectly for mending small nail holes and shallow dents that are less than 1/2 inch in diameter. It is specifically made for spot-filling, not wide surface skimming.
● All-purpose drywall joint compound (“mud”) :This type of compound is heavier and is made with gypsum. It is mainly used to embed drywall tape and to finish large damaged areas. Joint compound shrinks a bit when the water evaporates and may need to be applied twice or three times in thin layers. Joint compound provides smooth edges and blends well with larger drywall areas.
6.3 Essential Tools for Wall Repairs
● A flexible steel putty knife (2 to 3 inches) for mixing and applying the compound.
● A rigid taping knife (6 inches) for feathering the compound flat over wider patches.
● A sanding sponge with medium/fine dual grit (120-grit on one side, and 220-grit on the back).
● A can of aerosol drywall primer (or 1/4 quart of acrylic latex interior primer).
6.4 Step-by-Step Patching Protocol for Fastener Holes
1. Get Rid of Old fasteners and De-burr the hole: Get the nail, screw, or plastic anchor out. When anchors come loose, it usually pulls off burst drywall paper, leaving an existing rough lip. If you cover this lip with compounds, it creates a huge visible bump in your wall.
2. Make a Small Indention: Without pressing the screw driver too much, take the rounded end of your screwdriver handle (or the rounded bumper ball of the hammer) and gently press just right over the hole (resting it there). Then twist it ever so slightly to push the raised edges downward. You want to create a smooth, shallow depression, approximately 1/16 inch deep. Thus, the spackling compound can sit evenly down in it.
3. Clean Up: Use a dry paintbrush or vacuum hose to brush away the loose gypsum dust and torn paper. Left-over dust creates a barrier for the compound to stick to the drywall core.
4. First Pass Application: Grab a nickel size amount of spackling compound with your flexible putty knife tip. Then hold the knife at a 45-degree angle to the wall and pull it across the hole, applying firm pressure to push the compound down into the hole.
Then gently raise the angle of the blade to a 70 degree angle and scrape it across the patch to remove any excess compound. The patch should be slightly proud of the surrounding wall surface, because a bit of compensation will be needed for the drying shrinkage.
5. Soaking Up the Drying Times: Never sand wet or semi-dry compound. As water evaporates, the patch changes color from off-white or light pink to a consistent chalky white. Wait until the dry time indicated by the manufacturer’s label (typically 1 to 4 hours for small patches and up to 24 hours for filling deeper holes). If you do not respect the specifications, you will tear wet compounds and create a rough mess.
6. Feathering Second Coat: For holes larger than a dime, the first coat will shrink even slightly inward as it cures, so you can apply the second paper-thin coat of all-purpose joint compound using your broader 6-inch knife. Start about 2 inches outside the patched area and flatly held knife drag across the surface assuming either a right-angled or a 45-degree angle to feather the edges to nothing.
7. Sanding Smooth: Taking your sanding block wrapped with 220-grit sandpaper on a flat backing pad or a fine grit dual angle sanding sponge; sand the patch lightly in wide circles. Use maximum pressure only when your are through and only let the sanding surface and abrasive do the work.
8. Eliminating Sanding Dust: Entirely unsand the sanded area with a clean, slightly moist microfiber cloth which will help lift any stubborn gypsum dust. If such dust is not wiped clean, the fine dust will combine with paints which will give a gritty feel to the surface after its applied.
9. Spot-Priming the Patch: Painting directly over the bare joint compound is strictly prohibited. The unsealed gypsum compound is extremely porous and absorbs the paint binders on contact, a defect known as “flashing”, resulting in dull or chalky spots that become visible once the paint is applied. Apply a light coat of interior acrylic primer on the patch and let it dry completely before applying the topcoat.
7. Paint a Small Area to Learn Surface Preparation and Finishing
It can be overwhelming for a newbie to paint a whole room from the ceiling to the floor. After rolling out gallons of paint, and cutting in hundreds of feet of ceiling line, the results can be an exhausted painter with messy edges and roller marks.
Instead, learn the fundamentals of painting in a smaller, more manageable space such as an entryway accent wall or little powder room, or a neat laundry area so you can learn how to do surface preparation, brush technique, and roller technique without burning yourself out.
7.1 Selecting the Right Paint Sheen
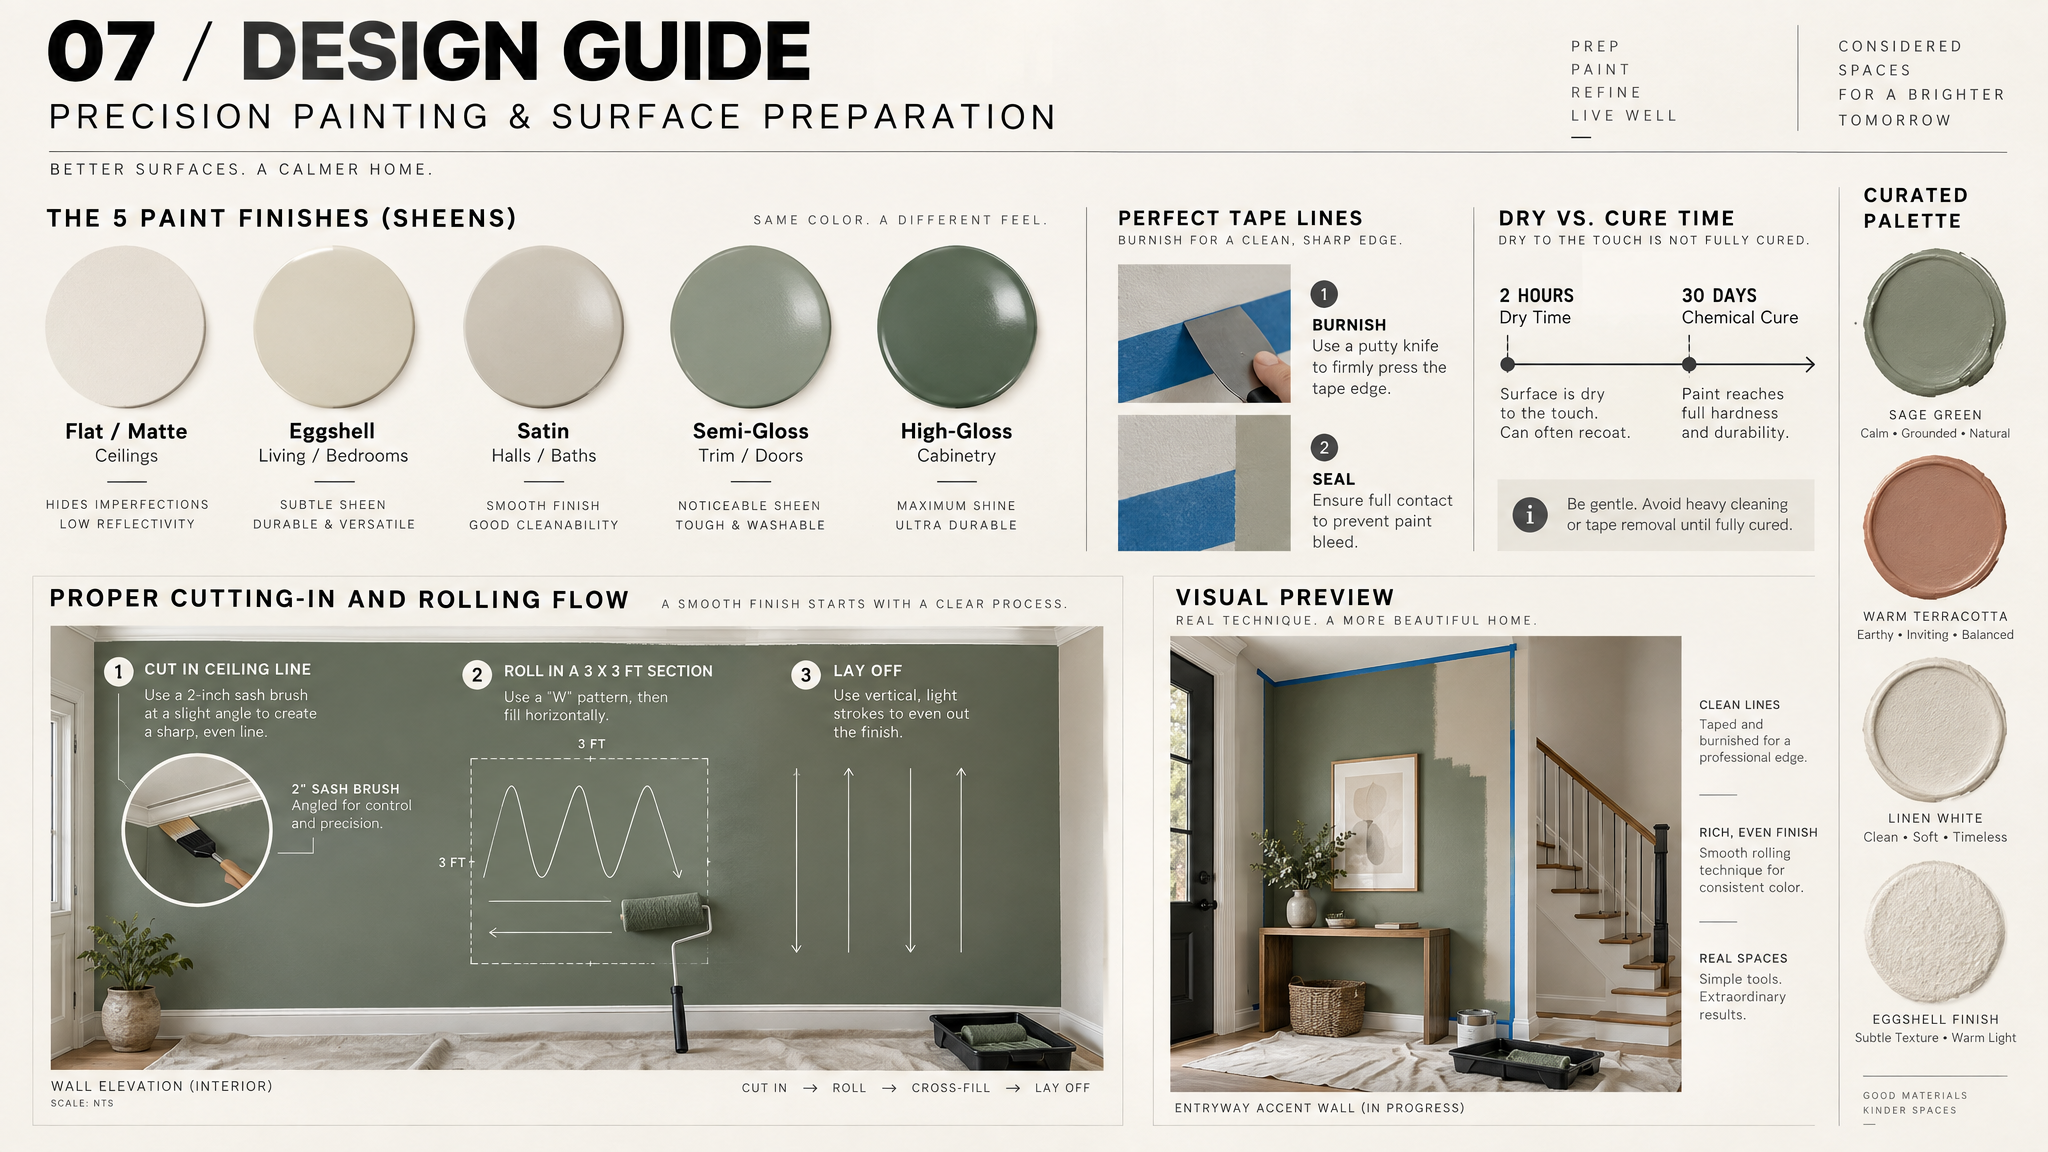
The term paint sheen refers to the reflective quality of the cured surface. The application of paint sheen is a compromise between the desired aesthetics, durability, and resistance to moisture:
● Flat/Matte Finish: Completely opaque. Its light-scattering qualities conceal small surface imperfections, unevenness of the drywall surface, and patched holes from sticks. Nevertheless, it is easily soiled and gets burnished quickly upon rubbing, which is why it is suitable for use in low-traffic parts of a house and ceilings.
● Eggshell Finish: Has a low sheen level, with a luster reminiscent of the surface of a chicken’s egg. It provides a good combination of protective qualities and the ability to be cleaned and is a standard professional choice for adult bedrooms, living rooms, and formal dining places.
● Satin Finish: Its smooth good feel combined with a higher resin density provides moisture, grease, and hand-cleaning resistance. This paint sheen makes it the best choice for halls with increased traffic, family rooms, laundry rooms, and bathrooms with no heavy steam from the shower.
● Semi-Gloss Finish: Very reflective and smooth to touch. It dries to a strong, non-porous, unwashable layer of color that repels water. This paint sheen is used only in the process of painting baseboards, door jambs, and cabinets in kitchens. This solid gloss causes a high rate of reflection of light, emphasizing imperfections of the surface and sanding marks.
● High-Gloss Finish: This is an ultra-durable reflective surface. It very rarely applied for large walls because minor surface irregularities become highly visible. High-gloss paint sheen is used for custom-made trim and wood cabinetry.
7.2 Comprehensive Wall Preparation: The Secret to Professional Results
Professional painters spend 75% of their time on the job cleaning and preparing surfaces before they ever open a can of paint. Paint is designed to adhere to clean and sound surfaces; it won’t bond correctly if there are any dust, oil from cooking, or body oils from the handles left behind:
● Washing The Walls: Take a bucket and fill it with warm water and a few drops of dish detergent that is mild and cuts grease or mix a mild solution of Trisodium Phosphate substitute (TSP-PF). Dip a clean sponge in the solution, wring it out so that it is just damp, and clean the walls from the bottom to the top to rid them of dust, lint, and grease.
● Rinsing and Drying: Use a clean sponge dampened with plain water to wipe the wall and rinse off any soap residue. Allow the drywall to dry completely for at least 2 hours before painting.
● Masking Baseboards and Trim: Use the highest quality, multi-surface painter’s tape that features edge-blocking technology (for example, FrogTape or ScotchBlue with Edge-Lock). Standard tan utility masking tape has dry aggressive adhesive that rips paint, dries quickly, and leaves sticky residue.
Press the painter’s tape down along the top edge of your baseboard, in such a manner that leaves an exposed wood trim margin of 1/16 of an inch above the baseboard. Press your putty knife or your thumbs along the taped edge tightly in order to burr the tape down tight. This method of mechanical burnishing seals the tape adhesive together and prevents wet paint from bleeding under the tape.
7.3 Step-by-Step Execution: Cutting In and Rolling Smoothly
1. Edges and Corners: Pour about one cup of paint into a lightweight handheld trim pail. Use a 2-inch or 2.5-inch premium angled sash paintbrush with synthetic nylon/polyester bristles. Dip the paintbrush 1/3 of the bristle length in paint and lightly tap the inside lip of your pail to allow the excess to fall off; DO NOT scrap the bristles against the pail rim as this results in loss of paint on the bristles.
To use the brush properly, hold it like a pencil, put the brush tip on the wall approximately 1/2 inch from the trim line, allow the bristles to bend slightly to an angled fan, and stroke the brush smoothly within the wall to the ceiling or corner of the wall. Paint a band that is about 2 to 3 inches wide.
2. Keeping a Wet Edge: Never cut in the whole room and allow that edge to dry prior to rolling the main walls. If you roll over dry cut-in paint, the two layers overlap rather unevenly resulting in a picture-frame effect on your wall. Cut in one individual wall and immediately roll that wall while the cut-in edges are still wet.
3. Paint Roller Loading: Use a 9-inch paint roller frame with a 3/8-inch nap microfiber or woven roller cover for smooth-looking walls. Dip the roller lightly in the well of your paint tray and roll it back and forth along the texture ramp until the roller sleeve becomes completely saturated with paint, but not dripping.
4. W Application Method: Try to section off the walls in 3 feet by 3 feet. Put the roller against the wall at mid-height and roll upward in a large sweeping “W” or “N”. This spreads the bulk of your paint evenly around this section. Without lifting the roller frame after the “W”, immediately cross-roll all of that “W” with horizontal strokes to fill in the gaps and apply the paint evenly.
5. Lay Off the Finish: Before moving to the next section, you need to finish the area by “laying off”. Position the roller at the peak of the section and roll lightly straight downward until you reach the baseboard, apply zero inward pressure. Work across the section and overlap about an inch with each stroke. This technique properly aligns the micro-texture of the paint thus eliminating roller lines and directional shadows.
6. Drying Times vs. Chemical Curing: It is critical to distinguish between dry paint and chemically cured paint. Types of premium latex paint that you will find in the market are dry to the touch within 1-2 hours and it generally allows for recoating after 4 hours.
However, the full coalescence of the chemical between the acrylic polymers turning into a sturdy film that is scrub resistant occurs sometime between 21-30 full days. Do not do any hard scrubbing on or putting heavy hanging loads near to the freshly painted walls during this curing phase.
7. The Magic of Color Sampling: Never ever select your paint color only from an ink printed swatch of color at the paint store. The lighting used in the store that features high-output fluorescent or cool LED lighting is heavily different from what your normal home lighting looks like. Order some 8-ounce liquid sample pots of your favorite colors.
Cut a large piece of white foam core board and paint two coats of each color complete, giving it about a 1-inch white border. Use painter’s tape to tape up the boards to different walls of your room and observe them throughout the day at natural morning light, afternoon light, as well as with your evening incandescents or warm LED lamps.
8. Update Décor With Peel-and-Stick Wallpaper or Backsplash Products
Self-adhesive, peel-and-stick decorative items (like vinyl wall coverings and faux-tile backsplash sheets) have made it so much easier for amateurs to update homes. Self-adhesive items have the look of patterns or textures of traditional wallpaper or tile, with none of the hassles of the water-based paste or wet mortar application process. Vinyl wall coverings or faux-tile backsplash sheets allow for clean installations, but accuracy and alignment are of utmost importance.
8.1 Wallpaper vs. Composite Backsplash Tiles: Intended Uses
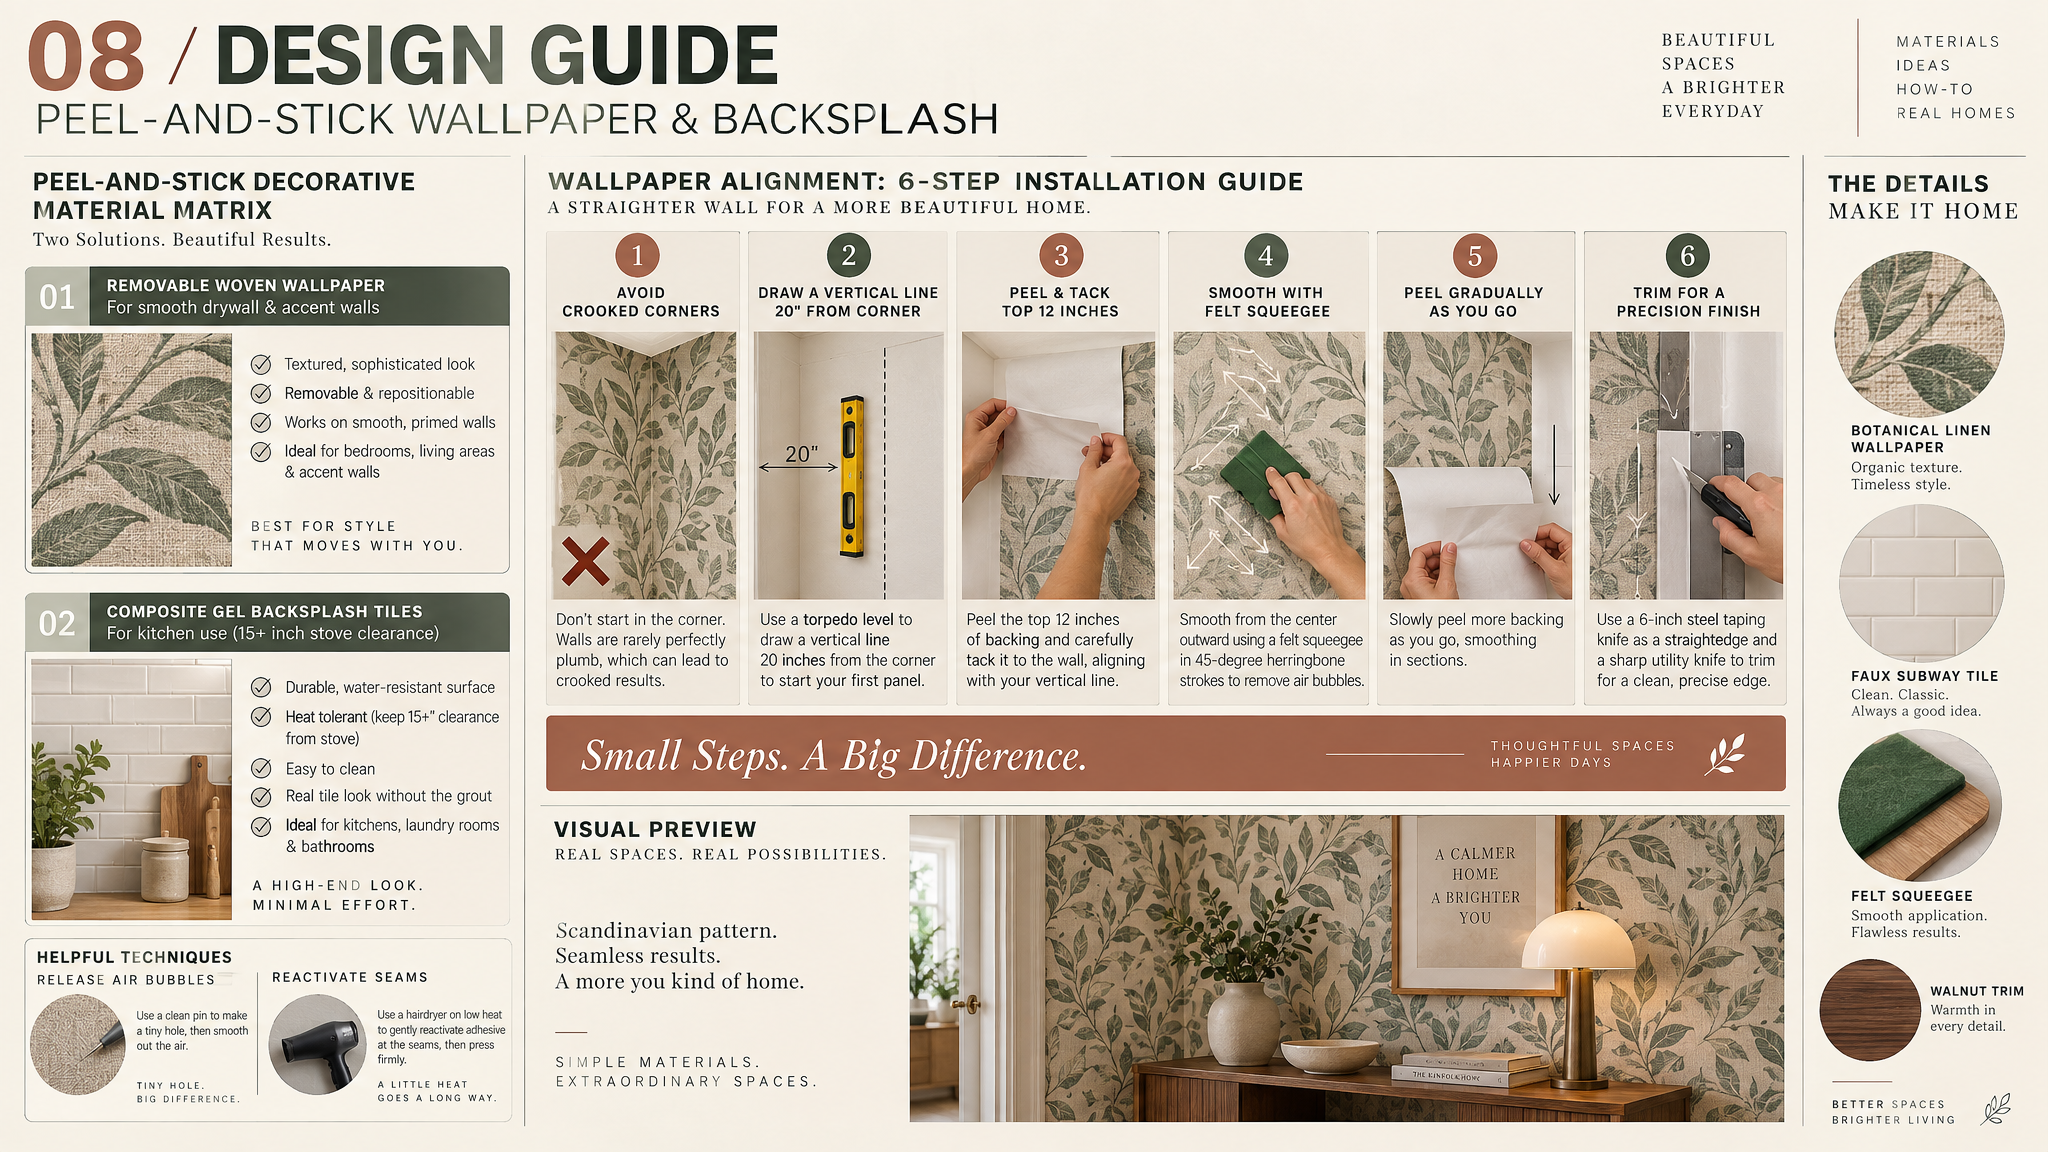
● Peel-and-Tick Wallpaper: Usually printed on flexible vinyl or woven polyester fabric on a low tack, pressure-sensitive adhesive sticky backing. The wallpaper is allowed to be moved around while you install it but it seamlessly adheres upon removing without damaging the drywall paper. It is a fantastic way of trying out some highlights on your accent walls, making some updates to rental places, and trying something unique on decorative furniture linings.
● Peel-and-Stick Backsplash Tiles: These are made up of thicker composite cores e.g. aluminium composite panel, rigid PVC and polyurethane gel domes that imitate ceramic tiles, glass mosaics or stone subway tiles. The tiles are fixed using aggressive, permanent and moisture resistant, high tack acrylic adhesives to ensure permanent bonding irrespective of the weather.
8.2 Assessing Surface Compatibility, Temperature, and Moisture
Peel and stick adhesives require the constant presence of solid, smooth and clean surface to remain attached for a long time:
● Texture Issue with Walls: Many homes have knockdown, orange peel or rough plaster textures and it is likely that self-adhesive wallpaper will not stick due to such textures. The adhesive touches only the little raised edges of the texture, and suspends the rest of it in the air.
With time, the airflow and gravitational force will make the paper unstick. In order to be able to use the self-adhesive wallpaper on heavily textured walls, it should be skim coated smooth with joint compound, sanded and primed.
● Thermal and Moisture Threats: It is impossible to stick the peel and stick products inside wet stalls, and right behind very hot equipment. Standard self-adhesive vinyl tiles are supposed to stay at least 15 inches far from the open gas stove burners. In the bathrooms with high humidity level it is possible for steam to soften adhesives and lift edges.
8.3 Calculating Accurate Material Needs and Pattern Repeats
Avoid simply ordering peel-and-stick wallpaper based on square footage. You need to take into account the “pattern repeat.”
● In modern patterned wallpaper, there are repeat intervals (often every 12, 18, or 24 inches) at which the pattern lines up with the adjacent pieces.
● When trying to match pieces together, you will often need to cut off several inches from each edge to keep the pattern consistent throughout the wall.
● Work in another 15% to 20% of extra material to cover for these adjustments and any mistakes cutting.
● Make sure you check that all of the rolls that you purchase have the same factory “Run” or “Dye Lot” number on the label. Different runs can have slight differences in background color or gloss of the ink.
8.4 Step-by-Step Installation Protocol
1. Surface Cleaning and Prep: Before starting the installation, make sure to clean the wall thoroughly using a 50/50 solution of isopropyl alcohol and water to get rid of invisible dust and grease. Let the wall completely air-dry. If the wall was recently painted, you should allow to fully cure the paint for at least 3-4 weeks. Applying adhesive over a fresh coat of paint may trap escaping solvents, causing bubbles and peeling the newly painted surface off when removing.
2. Establishing a True Plumb Line: Do not install your first paper on the corner of the room. The corners of a room in modern houses are hardly ever straight or plumb. When your first panel is installed even with a 1/16 inch slant off vertical, that slant adds up across the wall causing slants on every subsequent sheet. Instead, measure out 1 inch less than wallpaper roll width from the corner of the room. Use a torpedo level against the wall and make a light vertical reference line in pencil from the ceiling down to the floor. The plumb line will serve as a reference visual line for the edge of your first panel.
3. Hanging the First Panel from Above: Unroll the first panel and slowly peel back about 12 inches of the covering backing paper. Then, fold down that peeled section. Line up the long outer edge of the first panel with your vertical pencil plumb line overlapping at the top edge the ceiling by approximately 1-2 inches. Lightly tack the top exposed adhesive section to the wall.
4. Using a Felt Edge Squeegee: Do not smooth the wallpaper with your bare hands or with plastic hard scrapers since they may scratch the decorative print. Use a felt edge squeegee. Use firm strokes while smoothing starting at the center and moving outward in a herringbone pattern at an angle of 45 degrees. It will push the air pockets out to the open edges.
5. Slowly peeling the paper: Concur the felt edge squeegee, reach behind the panel and grasping the folded backing paper slowly peel it downwards about 12 inches at a time while smoothing the paper out against the wall.
6. Trimming the Edges: Use your retractable utility knife to trim the excess in the upper edge and baseboard. Keep a rigid steel taping knife firmly into the corner joint when trimming to serve as a straight edge and guide the razor blade. Keep the knife blade down at an angle of about 30 degrees to the wall. Always keep your knife replacement blades due to dull blade snags and tears of wet vinyl.
8.5 Troubleshooting Common Issues and Recognizing Product Limits
● Handling Air Bubbles: Should you happen to get a bubble while installing, simply lift the paper back just past the bubble and smooth it back down. If you have a bubble you’ve discovered after the panel is set, do not rip the paper. Just poke the center of the bubble with a sewing needle. Then, press with your felt squeegee toward the pinhole to collapse the region of air.
● Lifting Edges: If edges are curling or lifting over time due to some localized temperature change, simply reactivate the adhesive by warming the problem area with a hair dryer on low heat and press down firmly with the seam roller.
● When Traditional Materials Are Better: While you’re not going to beat peel-and-stick products for flat temporary upgrades, you will come to see when it makes more sense to go with traditional permanent materials.
If you’re in areas of high moisture like the showering zone of your home, or something like if you’ve got a kitchen where grease gets thrown around behind the stove, or somewhat heavily textured walls of the home, it would definitely be better to install traditional ceramic tile with a cement backer board, mortar, and waterproof grout.
9. Hang Curtains, Artwork, and Lightweight Shelves Securely
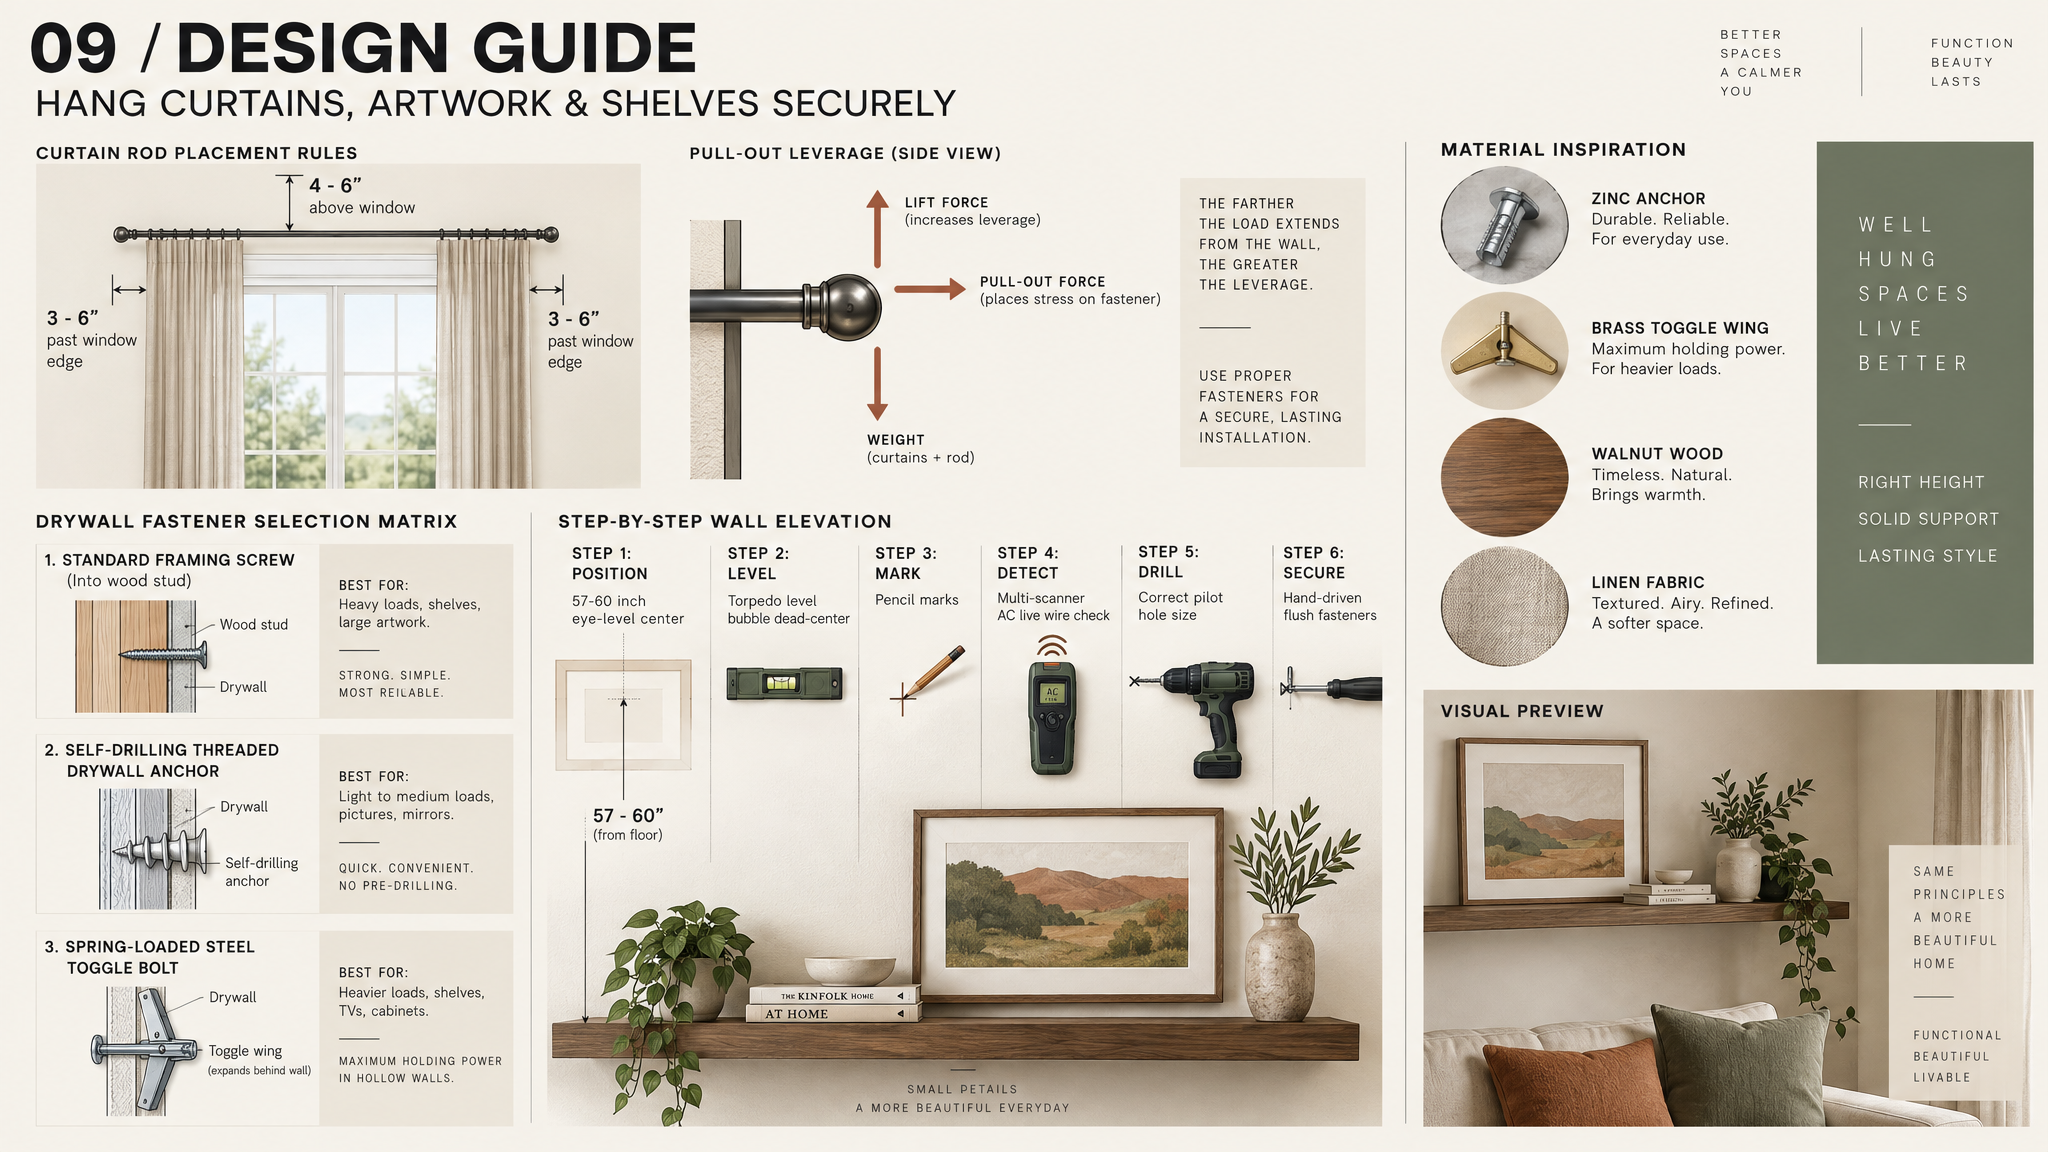
Bracing any item attached to the wall — such as mirrors, large framed pictures, curtain rods, or floating shelves — is a necessary skill that every homeowner needs to develop. An unlevel picture frame may be inconvenient and unappealing but when the heavy floating shelf or curtain rod actually comes out of the wall it constitutes a serious threat to the safety of children and pets. To ensure successful mounting, the fasteners must correspond to the wall structure and be utilized according to the knowledge of the mechanical forces involved.
9.1 Fastening into Wood Framing vs. Hollow Drywall Anchors
In residential construction, interior wall corners are usually constructed using wood studs (usually 2×4), which are spaced either 16 or 24 inches apart. Additionally, the wall is usually went over with 1/2″ thick gypsum drywall boards.
● Fastening Direct to Wood Studs: The most reliable method is to fasten directly into structural wood studs. If a regular 2-inch screw is driven through the drywall and into the structural wood stud, the pulled and shear strengths would be superb (pushing 50-100 pounds for every fastener). Fastening directly to wood studs is mandatory when it comes to support utility shelves, big structural mirrors and heavy drapery rods.
● Hollow Drywall Anchors: In most circumstances, your desired placement will not match up with the studs that are hidden behind the wall. When working in hollow drywall sections, you can use a special mechanical anchor that distributes the load of the drywall on the surrounding gypsum core and prevents the fastener from pulling through the drywall.
9.2 Anchor Types and Mechanical Holding Capacities
Do not use smooth taper plastic expansion sleeves in hollow drywall cavities. These sleeves are inexpensive and are used for solid masonry or concrete applications; when placed in hollow drywall, the sleeves twist off and pull out from the wall even when minor forces are applied. It is advisable to consider the fasterners made for hollow-wall application only.
● Self-Drilling Threaded Drywall Anchors (Zinc or Nylon): Such devices come with wide outer threads that screw directly into the drywall gypsum core, providing solid strength mechanically without any prior drilled hole in the drywall. Small pictures, wall clocks and other lightweight decorative applications can be installed without a problem using such mechanical devices and such items weigh between 15 to 30 lbs.
● Spring-Loaded Steel Toggle Bolts: They are the real heavyweight champion of hollow drywall installations. A toggle bolt comprises of a machine screw that is threaded through the two spring-loaded metal wings.
To install this type of anchoring device, you will have to drill a access hole of about 3/8 inch or 1/2 inch in size, compress the metal wings through the opening and allow the wings to snap open.
When you tighten the bolt, the metal wings spread out against the back drywall, even distributing the applied force. A good quality 3/16 toggle bolt can hold loads between 50 and 80 lbs in a good dry wall.
9.3 Working with Static Weight vs. Dynamic Pull-Out Loads
One mistake that happens often with novice installers revolves around installing the shelf according to just the static weight of the empty shelf, while not taking into consideration any dynamic load:
● A standard 3-foot x 1-foot-long wood shelf weighs around 5 lb. on its own.
● Adding hardback books on that shelf leads to another 30 lb. of dead static weight.
● Any loads being applied in downward direction on either the curtain panel or object being lifted up from the shelf would generate dynamic loads that pull out away from the wall face.
● Leverage effects: both the shelves as well as the curtain rods serve as levers. In case the longer extends from the wall face, there is more outward pulling-out force applied to the top mounting anchors. So, it is better to select anchors rated with enough load-bearing capacity than the expected total load being applied dynamically to the anchor points.
9.4 Step-by-Step Installation Protocol for Anchors and Fixtures
1. Height and Sightline Planning: The design standard for artwork and mirror placement is to have the vertical center of the piece hung at eye level — usually between 57 to 60 inches from finished floor to center of the image.
If you are installing curtain rods, be sure to mount the hardware higher and wider: putting the rod at least 4 to 6 inches above the window frame (or just below the ceiling molding) and 3 to 6 inches beyond each side of the window frame will make the window appear larger and allow more natural light into the room.
2. Leveling and Making Reference Marks: Hold your fixture or mounting bracket at the position you would like to have it installed. Lay the torpedo level across the top edge of the piece and level it to have the bubble indicator centered between the two lines. With a sharp pencil, mark the actual centers of the mounting holes onto the wall.
3. Scanning for Hidden In-wall Utilities: Take your electronic multi-scanner and scan over the marked locations to check for energized electrical lines or water pipes behind the drywall.
4. Drilling Proper Pilot Holes: When using toggle bolts or regular anchors, pick the drill bit that will match the diameter the manufacturer has specified. If you drill too large of a hole, the anchor will sit too loosely in the hole and wobble, and likewise, if the hole is too small, it will bind the anchor and twist it apart. Keep the drill steady and vertical.
5. Setting the Fasteners Flush: When using self-drilling anchors, install them using a manual screwdriver until the broad head is flush with the drywall paper surface. Once it is flush, stop there and do not drive the anchor deeper because it will tear the drywall paper and strip away part of the anchor to nearly 0% of its holding power.
6. Mounting the Hardware: Place the shelf bracket or curtain rod plate on top of the installed anchors. Drive in the mounting screws tight by hand. Verify with your torpedo level that it is level before you put heavy loads on it.
9.5 When to Step Back: Overhead and High-Consequence Installations
Be mindful of your abilities as a beginner. Hanging light weight shelving units, small mirrors, and standard blind rods are all possible projects for a novice DIYer. Heavy, overhead, or complicated projects are not projects an inexperienced person should try to take on themselves.
● Ceiling mounted fixtures such as fans, heavy light fixtures, hanging chairs or floating shelves for storing heavy cookware have great risk if they were to fall from where they were mounted because they were improperly installed.
● Ceiling mounted fixtures will need to be mounted to the structure and must be done right so that it can withstand any vibrations from the structures and any added weight being hung from them.
● Heavy overhead fixtures should be left to a licensed contractor or skilled handyman who knows how to properly mount those things and has the right tools to do it correctly.
10. Improve Comfort With Basic Weatherstripping and Door Draft Solutions
Exterior doors and windows that do not close completely allow outside temperatures to come in, causing heating and air conditioning expenses to rise and making the house uneasy. Fortunately, sealing drafts is a low-cost project that will quickly enhance your comfort and efficiency.
10.1 Diagnosing Door Gaps: Ordinary Drafts vs. Structural Framing Shifts
Prior to applying weatherstrip, check to see how a door has moved and aligned:
● Use the Dollar Bill Test: Take a dollar bill and close your exterior door on top of it, trapping the bill between the face of the door and wooden jamb of the door frame. If you pull the bill and it comes out freely, a result that indicates that the weatherstrip has either worn away or not installed. But, if you pull and the bill stays, then it indicates the weatherstrip holds firmly. Repeat each 12 inches around the perimeter of the door frame.
● Also use Flashlight Inspection: In your house, switch off the interior lights and stand inside. Ask one of the family members to take a bright flashlight and shine it along the exterior joints of the closed door, and if any light can be observed cutting through, then you have uncovered a gap that requires seal.
● Recognizing Structural Issues: A serious consideration is that a door sticking hard along its top edge and showing about 1/2-inch gap on the strike side bottom portion of the door indicates that the door frame has sagged out of its square alignment, which happened due to the foundation-related issues. So you may easily handle some minor gaps with a weatherstrip. But, a severely racked frame will need to be re-hung or the hinges adjusted before using a weatherstrip.
10.2 Selecting the Right Weatherstripping Profile
● Closed-Cell Foam Tape: A very inexpensive option that is simple to use. It compresses nicely in between two flat surfaces (i.e. the bottom of a sliding sash window). However, this type of tape breaks down quickly after repeated use from sliding friction. Thus, it is not good for the vertical jambs of exterior doors that are used regularly.
● V-Strip (Tension Seal): Consider a durable strip of plastic or flexible bronze, folded at 90 degrees (to form a V). One leg attaches securely to the door jamb, while the other springs out to fill the different gap sizes. V-strip seals can hold up well to the sliding friction induced by a door opening and closing.
● Tubular Silicone or EPDM Rubber Gaskets: High-performance, hollow, bulb seals with good elasticity. They compress nicely as the door closes and latch. The gaskets create a weatherproof perimeter seal that stays supple in sub-zero temperatures.
● Screw-On Mechanical Door Sweeps: A mechanical door sweep is a rigid aluminum channel holding a flexible neoprene profile/silicone blade. It is attached to the inside bottom face of the door using adjustable slotted screws.
10.3 Step-by-Step Installation Protocols
1. Complete Surface Preparation: Weather stripping that has a sticky back will not adhere to dusty, peeling surfaces. Use your putty knife to scrape off any peeling surfaces along the interior door stop trim. Use a cloth soaked with isopropyl alcohol to clean the wood, and ensure it is completely dry.
2. Take Measurements for the Jamb Strips: Take measurements of the height of the vertical strike-side and hinge-side door jambs and the width of the top horizontal header. Cut the rubber or foam weather stripping to length with your utility knife or heavy shop shears.
3. Description of Application: Pull back the adhesive backing paper 6 inches at a time. Holding the strip in place press firmly wherever the strip touches the door stop molding. As you are doing this, apply pressure along the strip while being careful not to stretch the rubber. Stretching the material puts internal tension into it and will ultimately cause the adhesive to pull off of the wood frame.
4. Installation of the Door Sweep: With the door closed, take a measurement of the total width of the door along the bottom edge. Mark this distance on your aluminum door sweep. Slide the rubber insert slightly out of the aluminum channel. Cut the aluminum track with a fine-toothed hacksaw, trim the rubber insert with your utility knife to be precisely 1/8 inch longer than the metal, and slide the rubber back in.
5. Clearing the Sweep: Close the door and latch it. Place the sweep against the bottom surface of the door while being sure that the flexible rubber blade touches the top of the threshold lightly and evenly. Avoid applying too much pressure when pressing your sweep down, as too much pressure will cause the sweep to drag against the floor, making closing and latching the door difficult.
6. Fix the Sweep: Most sweeps have slotted mounting holes. Mark the centers of the slots and drill 1/16-inch pilot holes into the face of the door. Drive the mounting screws snug with a hand screwdriver after drilling.
7. Test to Verify Doors Opening: Test to ensure that the latching action occurs smoothly. The door remains latched when merely pushed lightly without needing to be shifted with force. If the deadbolt binds, the newly applied weather stripping is too thick or the sweep was applied low. Adjust the position as necessary to ensure proper door operation.
10.4 Essential Safety Boundaries: Combustion Air and Egress Routes
When sealing up your house, you have to remember some important building safety regulations:
● Never seal interior doors to mechanical utility closets where gas water heaters, gas furnaces, or fuel-burning appliances are situated. They need a continuous flow of fresh combustion air in order for them to work correctly. If you block the air supply to them in any way, the appliances can produce life-threatening carbon monoxide gas inside the house.
● Never seal operable bedroom windows or emergency egress doors in a way that would make it difficult for people to escape from the house if it is set ablaze.

11. Learn Basic Caulking and Furniture Refinishing as Next-Step Projects
Now that you have mastered simple hardware replacements, drywall patching, careful painting, and weather stripping, you can move on to more complex endeavors. Excellent follow-up projects would be simple perimeter caulking and small furniture refinishing. These projects capitalize on the surface preparation skills and fine-motor skills you have already developed and produce beautiful, professional results.
11.1 Selecting the Right Sealant
Strolling through the caulk aisle, one will encounter two primary formulations which do completely different things.
● Siliconized Acrylic Latex (Painter’s Caulk): The typical choice for general interior trim, baseboards, casings for windows and molding, is painter’s caulk. It is a clean-up in water, has virtually no odor, tools well with a damp finger and can be painted when dry with regular latex wall paint. It will shrink slightly when curing and is not intended for continuous water immersion.
● 100% Pure Silicone Sealant: The necessary type for wet locations like shower pans, bathtubs, sink tops, and wet countertops. Silicone caulk is flexible permanently, will not shrink, and includes anti-fungal additives to prevent mold growth or mildew. However, normal silicone cannot be painted; it will repel the paint immediately. In addition, there is the intense smell of acetic acid during the curing process (like vinegar).
11.2 Step-by-Step Caulking Protocol
1. Remove Old Sealant: You should never put fresh caulk on top of an old, cracked, or moldy bead. If you try to use new caulk this way, it won’t be able to properly bond with the failing material, and you will have a leaking and splitting joint within months. Take either a rigid caulk-removal scraping tool or a utility knife to cut away the dried caulk on both sides of the joint. Use a stiff nylon brush to clean out the leftover residue.
2. Clean and Dry the Seam: Make sure to wipe the joint clean with a rag soaked in isopropyl alcohol to help remove soap scum, body oils, and dust from the surface. Allow the seam to dry thoroughly before applying the fresh sealant. If you can’t get the moisture out from underneath the caulk tip, then the newly applied caulk will promote the growth of hidden molds and won’t bond properly either.
3. Preparing the Caulk Gun: Restrain from purchasing an expensive “dripless” caulk gun. You can buy affordable dripless caulking guns that immediately release and stop any dripping from the tip of the caulk whenever the trigger is released.
4. Cutting the Nozzle Correctly: Most people cut the tip of the nozzle down too far in such a way that you end up having a huge hole at the end that creates too much caulk. Use your knife to cut the tip of the plastic nozzle at a sharp 45-degree angle while leaving just enough that the nozzle has a small 1/8″ opening. To puncture the foil safety seal deep inside the nozzle, use the fold-out metal puncture wire.
5. Laying a Smooth Bead: Hold the caulk gun at a 45-degree angle to the seam. Apply even hand pressure to the trigger as you move the caulk gun continuously along the joint or seam. It is generally easier to push the tip of the nozzle forward into the joint rather than pull it backward. This will force the caulk inside the seam nicely and provide a tight bond.
6. Tooling the Bead Smooth: Tool the new bead immediately after you’ve applied it. With the use of acrylic latex caulks, moisten a lint-free microfiber cloth with plain water, or simply use the finger of the rubber glove that you were working with earlier. Simply run your finger on the wet bead in a continuous pass using slight pressure.
This will provide a nice, smooth concave seal and feather the edge up nicely to each surface. Wipe away any excess caulk as you tool the bead. If you are using silicone sealants, you should get a specialized silicone tooling profile block or mist the bead with a little 70% isopropyl alcohol before you tool it smooth.
7. Never Caulk Required Weep Weep Holes: You should never caulk the required exterior weep holes located along the bottom metal of the storm windows, the weep channels at the bottom of the exterior brick veneer walls, or the bottom notch of the exterior lap siding. These openings are engineered strategically located drainage points that allow for any trapped condensation to escape.
11.3 Introductory Furniture Refinishing: Small Wood Accents
Refinishing a large and elaborately decorated family heirloom dining table can be too much for a beginner. Instead, use wood refinishing for small and easy wood objects: unfinished pine end table, a small floating shelf, or simple stool.
1. Cleaning The Surface: Clean the item thoroughly with a rag soaked with mineral spirits to dissolve any old wax or furniture polish or skin oils. Allow it to dry thoroughly.
2. Sanding Grits Progression: Always sand in the grain direction, not cross-grain, as when you use cross-grain sanding you leave scratches in the wood that will stand out like a sore thumb once conditioned. Start with the medium 120-grit paper first to remove old surface imperfections, move to 180 to smooth the grain, and finish with a fine 220-tack cloth.
3. Getting Rid of Sanding Dust: Use vacuum to remove standing dust with a soft brush vacuum attachment, then clean bare wood surface with a painter’s tack cloth.
4. Using Pre-Stain Wood Conditioner: Softwoods like pine, fir, and alder absorb stain unevenly leaving dark, blotchy spots across the surface. Using a clear pre-stain wood conditioner before applying the stain holds absorption captive for a few minutes until the stain can be applied evenly.
5. Applying Stain: Use liquid stain with a clean cotton cloth or foam brush applying the stain in the direction of the wood grain. Allow the stain to penetrate wood fibers for two to five minutes. Before it dries, wipe away with a clean dry cotton soft cloth all the excess stain from the surface. The final color depth will depend on the wood type and absorption time and not by leaving a thick pool of wet stain on the surface.
6. Sealing off with Top Coat Protection: Protect stained wood, use a durable top coat, like water-based wipe-on polyurethanes. Water-based polyurethanes dry fast, practically odorless, and will not yellow unlike traditional oil varnishes. Apply two or three thin even coats with a high-density foam brush. Each coat needs to dry for four hours then lightly hand sand with ultra-fine 320-grit sanding pad, wipe the dust, and apply the top coat.
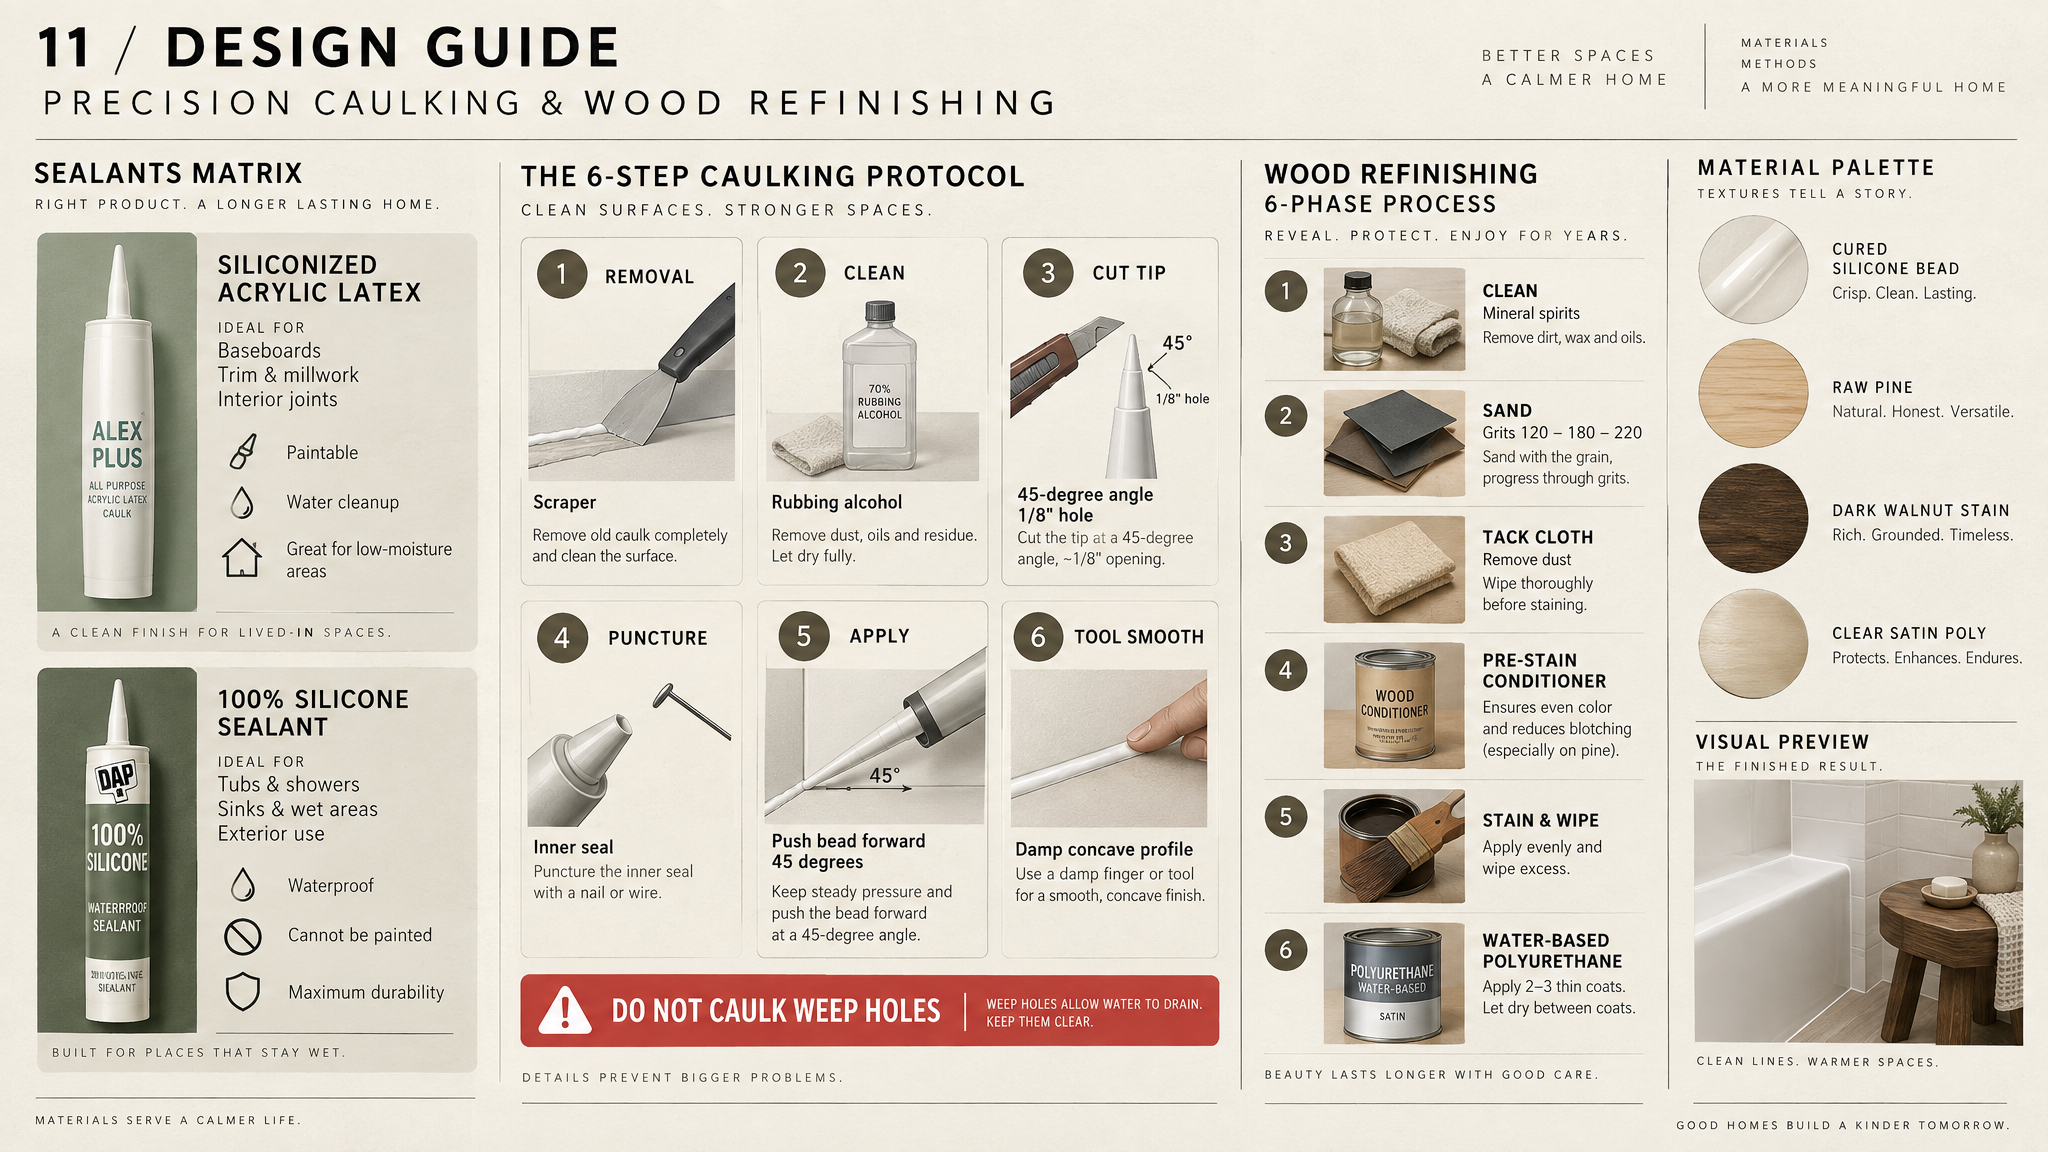
12. Inspect Your Work, Maintain the Results, and Know When to Hire a Professional
Finishing a DIY project is not just a matter of putting the tools away and calling it a day. Conducting a structured inspection, cleaning up well, and keeping a record of your work are what will distinguish between a professional quality improvement that can last for years and a simple job that requires correction in a couple of weeks.
12.1 Final Quality Control: The P-A-C-E Inspection Framework
Go through your completed work using the P-A-C-E template to confirm all the following:
● [P] Physical Fastener Integrity: Gently shake or push against your installed fixture, handle, or shelf. Are the fasteners secured? Is there any mechanical play, clicking, or wobbling under slight hand pressure?
● [A] Alignment and Square: Back up three paces and check the visual lines. Use your torpedo level to check that settled loads have not rotated the installed fixture out of level.
● [C] Cleanliness and Surface Finish: Check the perimeter edges under bright, angled task lighting. Are your paint cut-in lines clean and free of bleed-through? Are the finished caulk beads consistent throughout, without gaps or smeared edges?
● [E] Environmental Normalization: Carefully remove floor coverings and any protective furniture plastics. Unseal set-up central HVAC vents during painting and open the windows to diffuse lingering odours.
12.2 Conducting a 48-Hour Follow-Up Inspection
Make sure to schedule a short follow-up check 48 hours after you’ve completed the project. Moving through a normal daily residential life often exposes minor issues, which often go unnoticed immediately after the project.
● Check newly updated cabinet drawers by opening and closing them a few times to ensure that the screws haven’t loosened due to the vibrations.
● Recheck the newly installed weatherstrip to make sure it continues to make a tight seal on the door without catching or binding on the threshold.
● Inspect the newly patched and painted walls in natural daylight to verify that the drying shrinkage and flashing don’t happen due to paint.
Finding out about these little issues early on, and correcting them, allows you to enjoy your improvements for a long time.
12.3 Storing Leftover Materials and Documenting Finishes
Unused and left over paints, primers, glues and extra hardware come in handy if you take good care of them and keep records:
● Paint Storage: When putting a lid back on the paint can after you have finished using it, clean the rim as best as you can without letting paint remain, as that will prevent the lid from sealing well: paint is likely to dry out if it is unable to seal.
Use a clean rag or wood block over the metal lid later and tap it with a mallet until it fits properly. Never store your paints, adhesives, or caulks in a non-heated shed or attic: the latex paint can get ruined during freeze-thaw cycles. The paint cans must be kept in a cool, dry utility closet inside the house.
● Record Keeping: Keep a permanent marker beside your paint can to write down the details of your project right on the lid of the can, such as room name, surface, date, paint formula number, and sheen level (for instance, “Main Hallway Accent Wall – Eggshell – Revere Pewter – Oct 2026.”)
● Keeping Track of the Home Maintenance: Use a physical binder or note on your phone to keep track of your home maintenance details. Paste formula stickers, staple receipts of the hardware you bought, and write down drill bit sizes, types of shelving anchors (if any) used for these shelves, etc. When the time has come for your touch-up down the road, you will not have to use a guessing game playing with colors or sizes!
12.4 Common Beginner Pitfalls and How to Avoid Them
Each DIY project will have a learning curve. Knowing the most common novice pitfalls will assist you in avoiding some unfortunate mistakes:
● The Rushed Measurement Mistake: Measuring by memory or rounding measurements (for instance, to the nearest half-inch) will often result in throwing away materials, and rounds that are not true. If you measure twice, and instantly write down the exact number, you can double-check your measurements before irreversible mistakes.
● The Skipped Cure Time Mistake: Often people start to work immediately after they’ve painted or applied the joint compound, after just feeling it dry. The result of this mistake will be marred finish, shredded drywall paper, and hardware that scraped and even came off. You should always consider the fact that curing times are calculated by the manufacturer.
● The Substrate Disparity Mistake: One should never use latex paint on the dirty surface of an oil-based paint, and then wonder why the layers separate, or why it doesn’t stick. You can avoid any possible issues if you remember to wash, sand and prime.
● The Stripped Fastener Mistake: Trying to use a mismatched bit with the soft diameters of a screw, for instance, forces every screw opening greatly, and damages internal threads. Choose the right tool for such delicate work.
12.5 Knowing When to Stop: Recognizing the Limits of Beginner DIY
A key characteristic of an excellent DIYer is being aware of when it is best to stop working and consult a professional. Don’t think twice about hiring a registered trade professional whenever you experience any of the circumstances mentioned. This does not make you unqualified as a DIY person; rather it shows prudent decision-making in order to keep your family safe and secure your house in the long run.

Conclusion
A successful step toward DIY does not have to involve an ambitious whole-home renovation. It is rare that the wow factor is the result of demolishing a wall or dropping ten thousand dollars on custom cabinets for the kitchen. The wow factor is usually based on small improvements that matter; a properly placed cabinet pull, a properly patched and painted wall, a door that seals drafts, or a closet that appears uncluttered.
The best easy DIY projects for home improvement for beginners have four characteristics in common; a clearly defined target, simple steps to complete the task, tools that can be adjusted and mastered safely, and risks that are understood meaning the buyer can assess the consequences of failures before any action has been taken.
More importantly, when the DIYer prepares for the work environment properly, follows instructed processes, and gives himself or herself the time required to learn the craft, almost all of the stress is eliminated, and real confidence builds up.
You should take a new journey in your home this week. Choose one easy improvement from the guide, note down your measurements, and create a supply list to use in starting the improvement task. Focus on just that small project. Do it cleanly, inspect your work, and enjoy the satisfaction of improving your home.